Webhooks
In this guide
How to configure Indigo to receive webhooks from external services using the Webhook trigger type. Covers the three webhook data formats (JSON POST, FORM POST, GET), the URL pattern for calling a webhook, API key authentication, and how received data is passed through to action scripts via the event data mechanism.
Another feature that we started (before going down the event data path) is to make it easier for users to capture webhooks. As you may know, these are quite popular with internet services, be it doorbells, network equipment, location apps, etc. These services can sometimes be used with the HTTP API, but there are limitations to that which cause pain.
Without the event data mechanism, webhooks might still be somewhat useful, but to make them really useful we needed to pass the data through to actions. That was the final motivation to create the mechanism discussed above.
The new Webhook trigger event type (under the Web Server trigger section) allows the user to specify an ID (we prepopulate it with a random UUID but the user can override that if they like) and how the data will come in. There are 3 options for receiving webhook events:
- JSON POST - this type of webhook will accept a POST and interpret the payload as JSON. The
event_datadict will contain two keys:http-post-contentwhich will be"JSON"anddatawhich will be the full JSON payload as a dict or list, whatever the caller passes in. - FORM POST - this type of webhook will accept a POST with optional form data, which will be converted into a dict of name value pairs and passed through as
data. Thehttp-post-contentkey will be"FORM"in this case. - GET - this type of webhook will accept a GET and will pass through any query arguments as the
dataelement.
Calling a webhook is a very straight-forward URL pattern:
As with the other APIs, the caller can either send a Authorization header of Bearer APIKEYHERE or can pass it as a query arg to the url:
We believe this covers the vast majority of webhook options that are in use at the moment (let us know if you have an example of one which wouldn't work correctly and we'll look into it).
Broadcast
Webhooks will also use the broadcast function to send out the entire event_data dict to any plugins that subscribe to events from the web server:
Subscribers can:
iws_id = "com.indigodomo.webserver"
indigo.server.subscribeToBroadcast(iws_id, "webhook-received", "webhook_received_method")
Locative Webhook Examples
The Locative geolocation app provides location notifications on iOS. It has very good support for webhook events and therefore is a great example for our webhook implementation.
Here's a rough summary of how locative works: users can define a geofence (or beacon) as a location. Here's an example of two locations we'll use in this example:
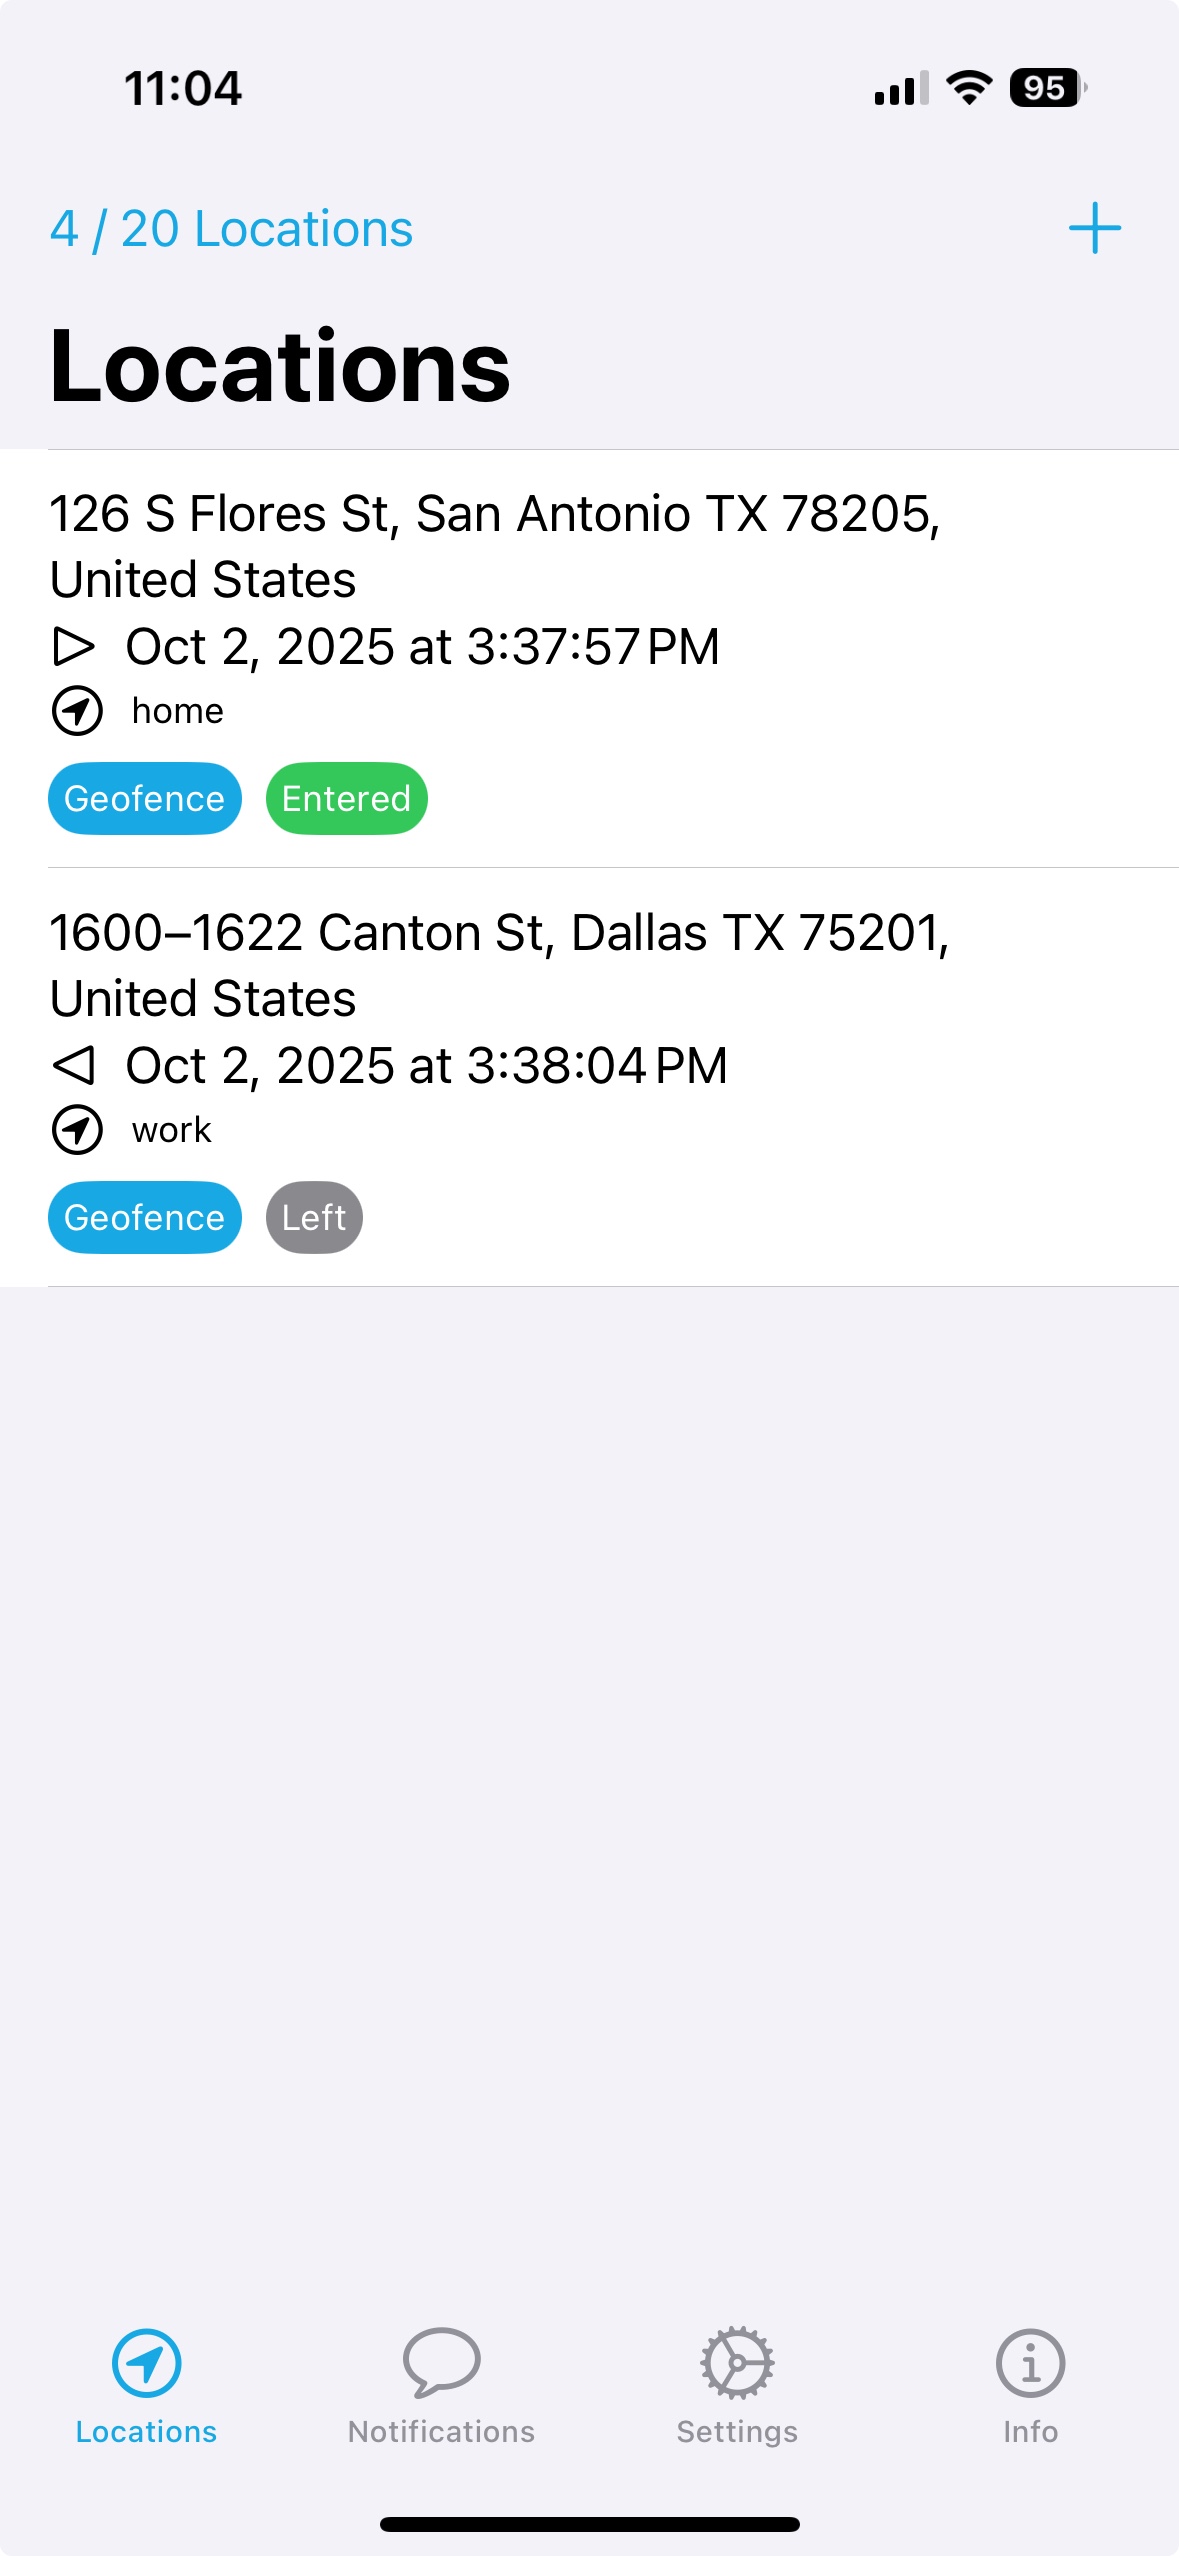
We've defined (completely made up) two geofences, one that represents a home and another representing a work location. Whenever a location is entered or exited, Locative can send webhook requests that Indigo can catch and act upon:
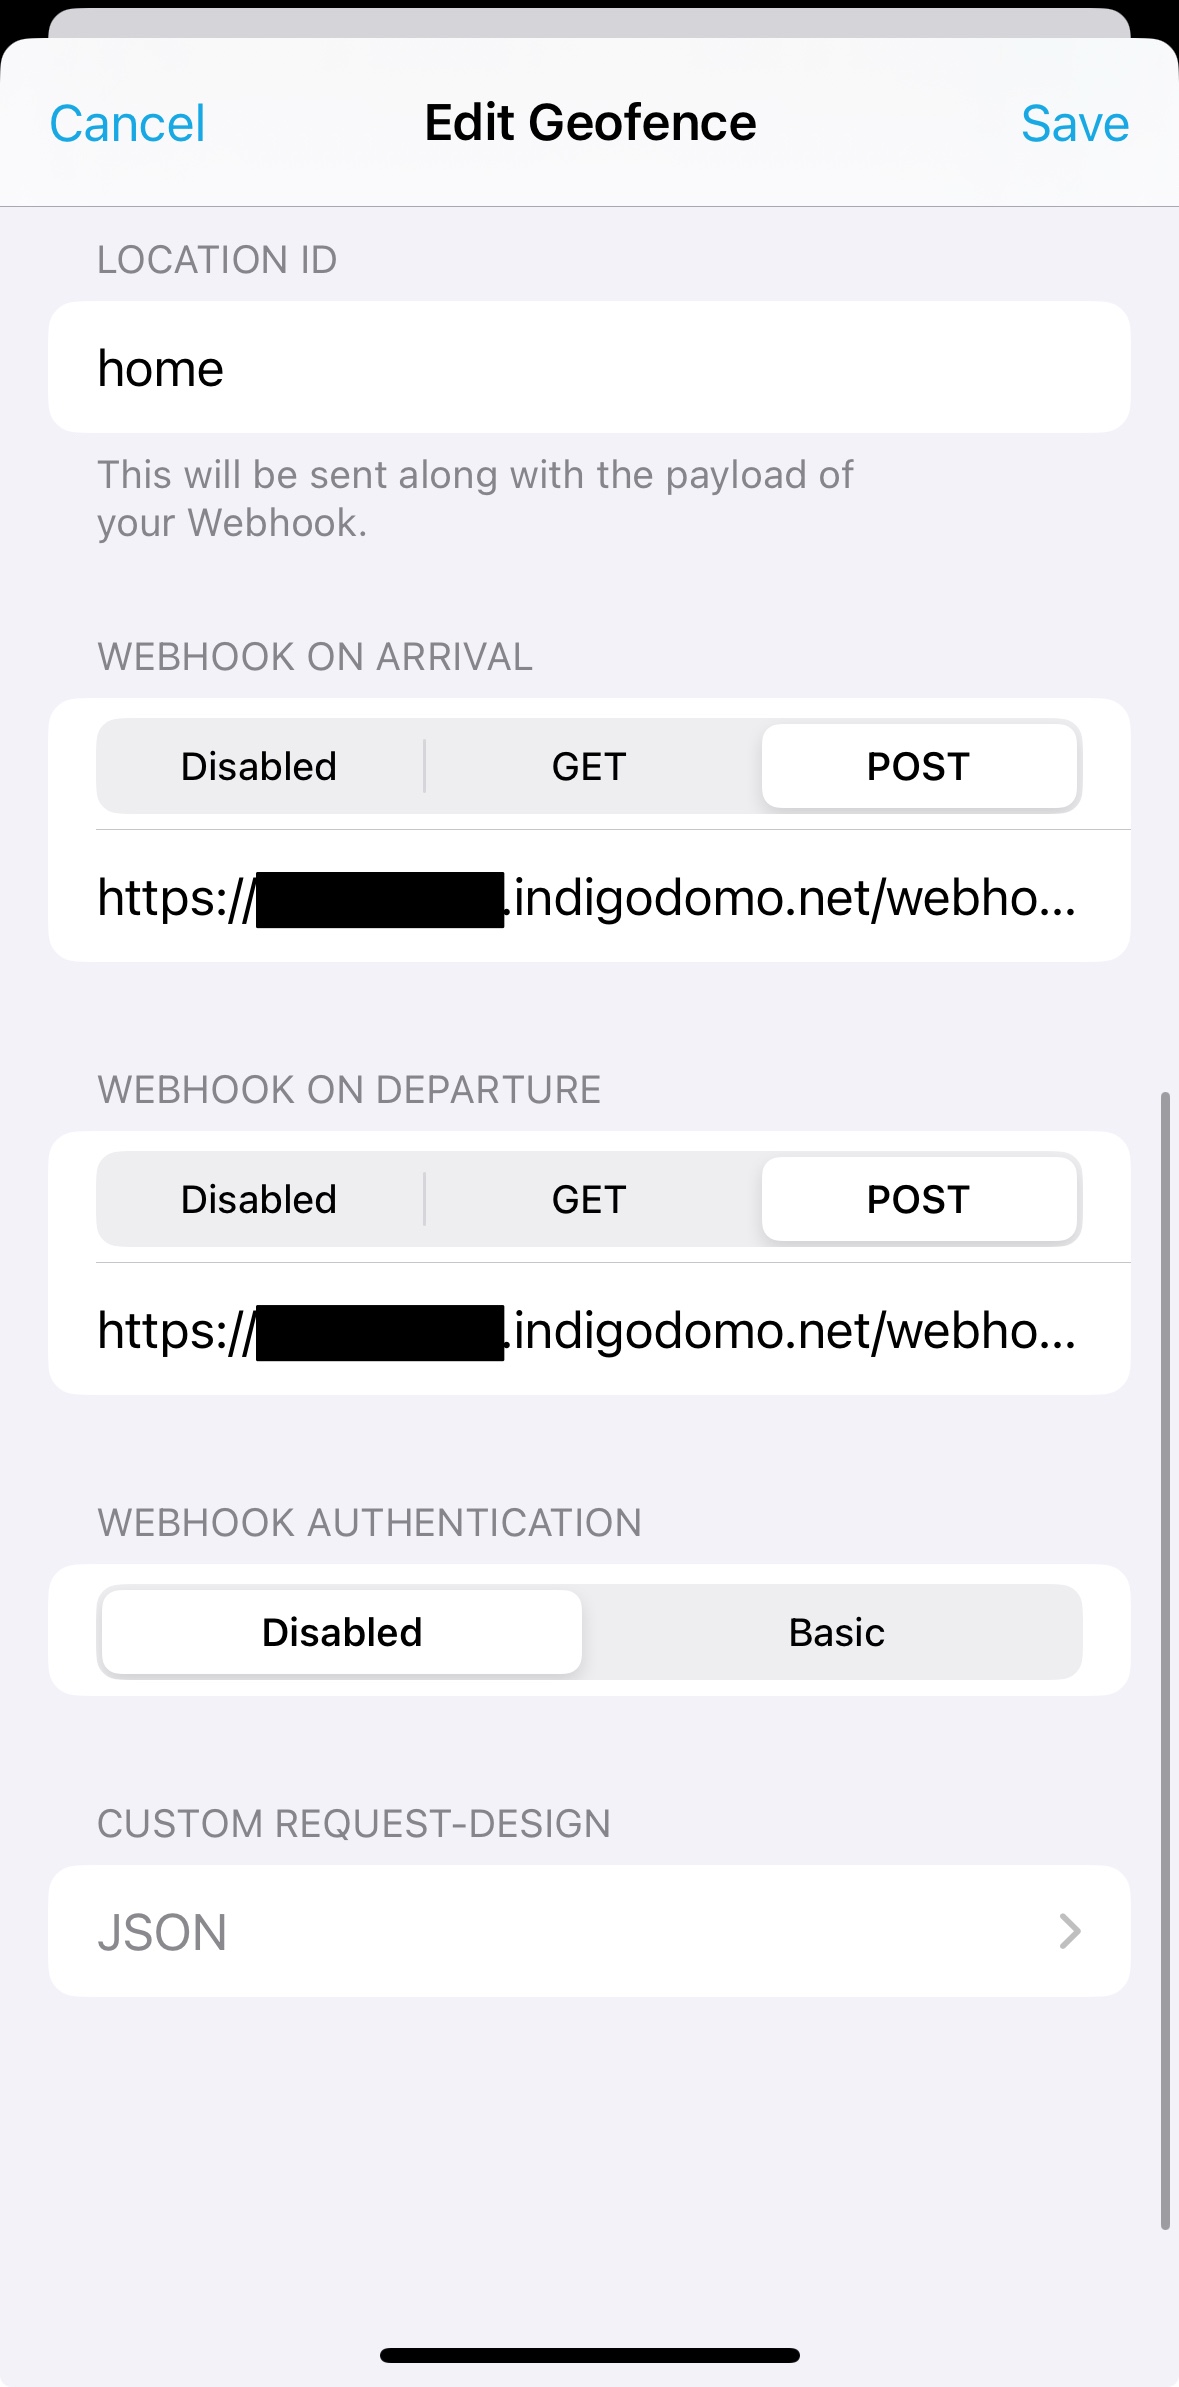
Here's what each of those fields represent:
- LOCATION ID - this is an ID that will be sent to the webhooks endpoint whenever the webhooks are sent so if so desired the user can use a single endpoint to handle all locations. We describe this approach in the advanced below.
- WEBHOOK ON ARRIVAL - this is the URL that will be used when the geofence is entered. You also specify the request type (Indigo handles both POST and GET requests).
- WEBHOOK ON DEPARTURE - this is the URL that will be used when the geofence is exited. You also specify the request type (Indigo handles both POST and GET requests).
- WEBHOOK AUTHENTICATION - you will be using an API key specified on the URL line, so this setting should always be Disabled.
- CUSTOM REQUEST-DESIGN - Locative allows you to specify which data will be sent to the webhook. We'll describe below two different payloads (one JSON and the other FORM POST) that we defined for this though you can create your own.
Payloads
As mentioned above, we define two payloads. The first payload uses JSON format while the second is a FORM POST which will also double as GET query string parameters. First, we define the "JSON" payload like this:
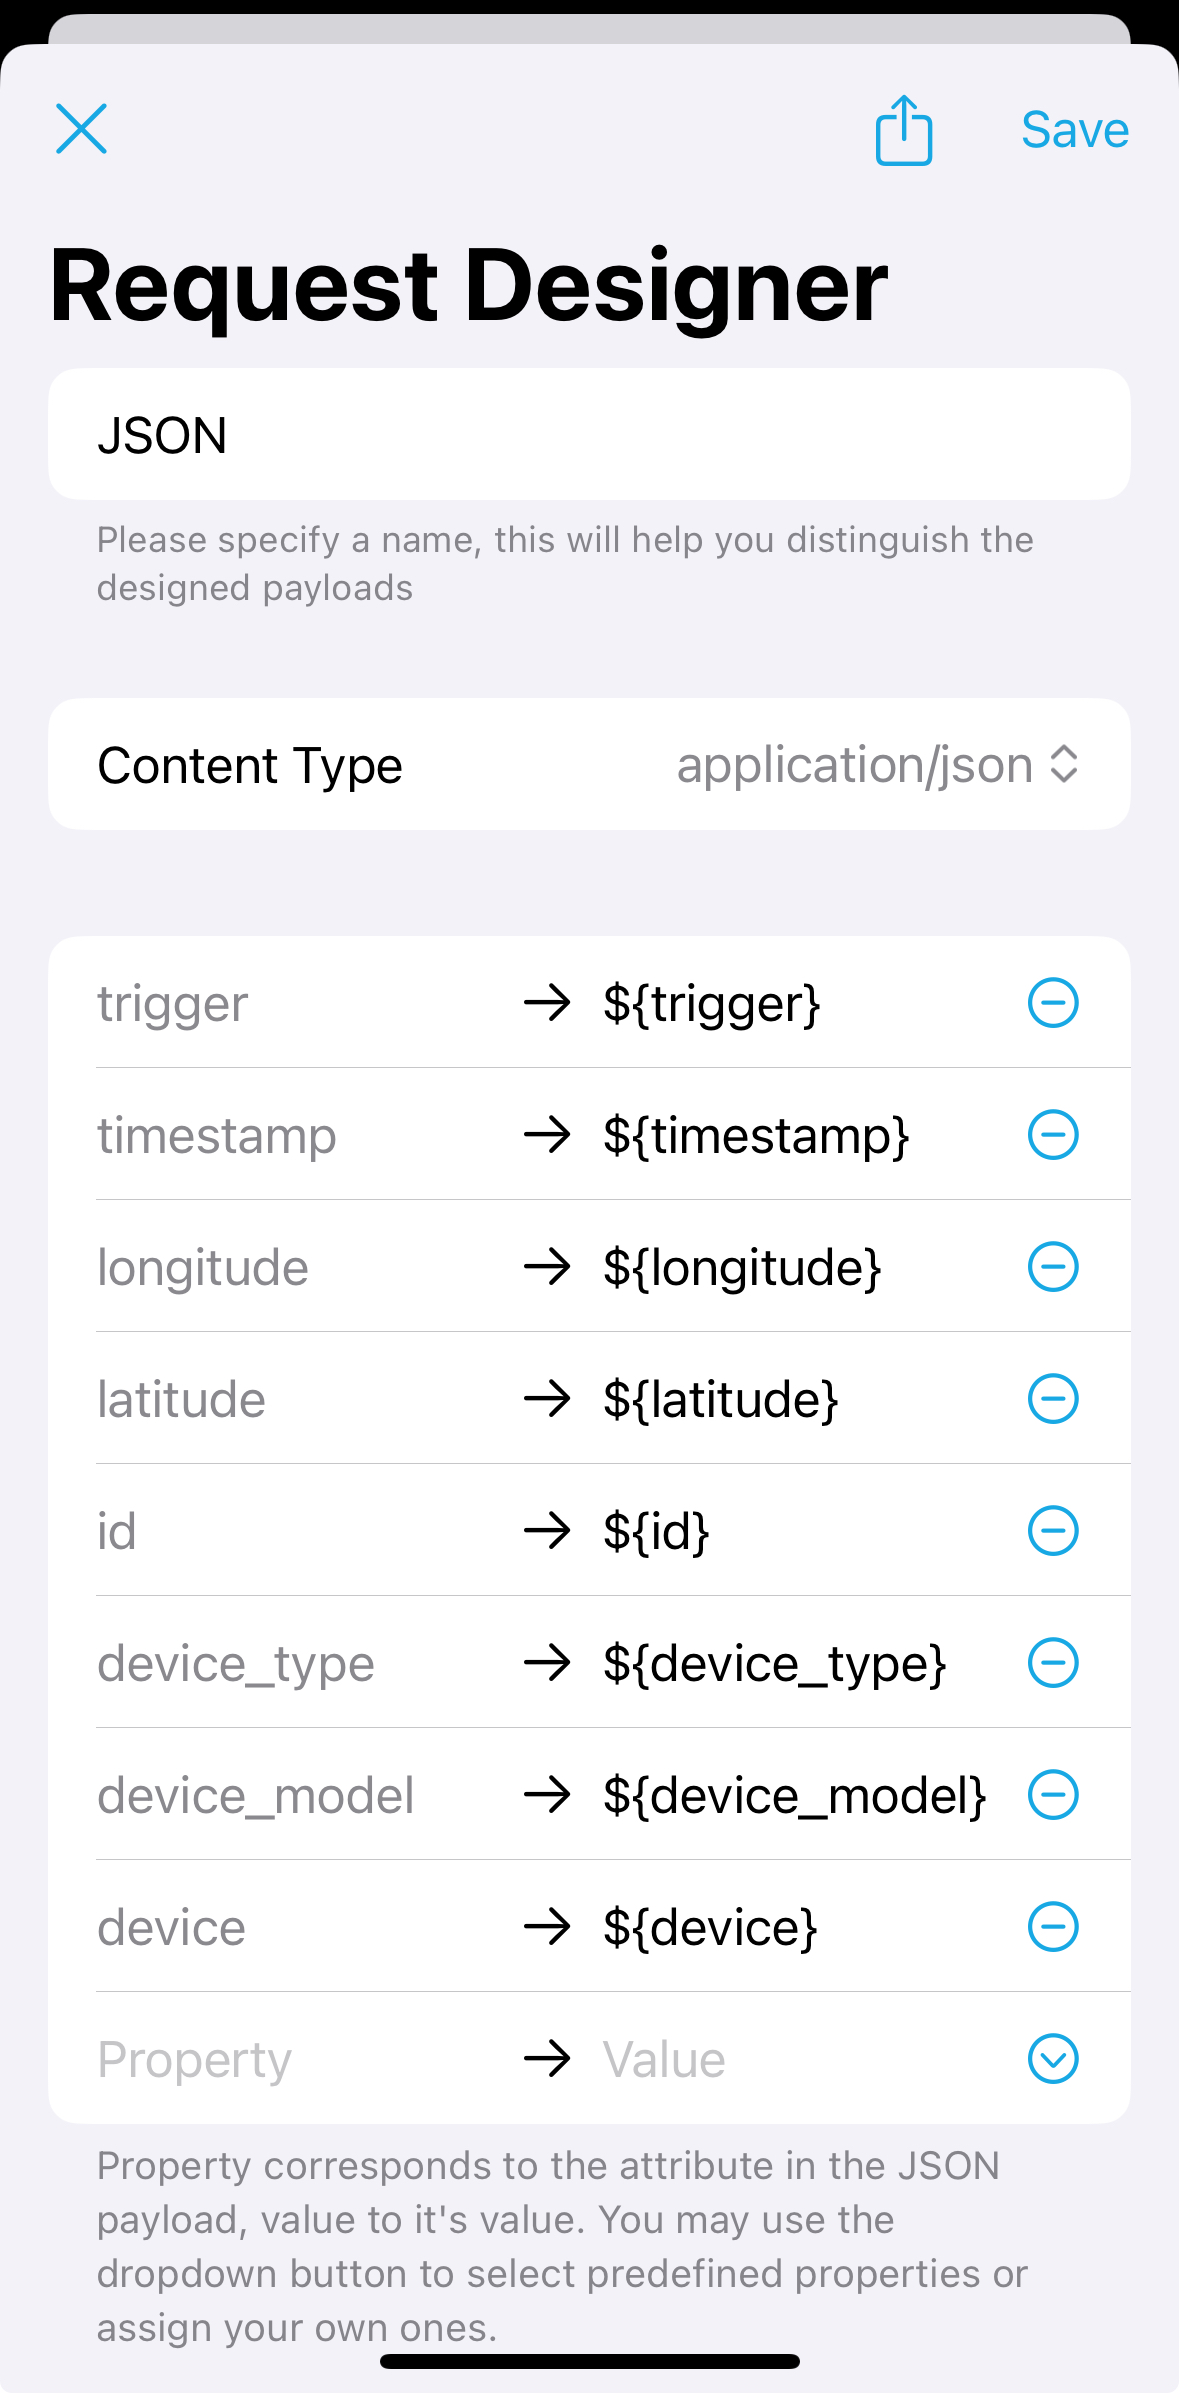
The Content Type is set to application/json and for completeness we're including all the fields that Locative supports (as of this writing). The resulting JSON looks something like this:
{
  "device": "A-UUID-THAT-REPRESENTS-YOUR-IOS-DEVICE",
  "device_model": "iPhone15,2",
  "device_type": "iOS",
  "id": "home",
  "latitude": 29.12345,
  "longitude": -96.12345,
  "timestamp": 1759348496.39196,
  "trigger": "enter"
}
The other payload is "FORM POST", which is similar but instead of JSON we specify it as //application/x-www-form-urlencoded; charset=utf-8//:
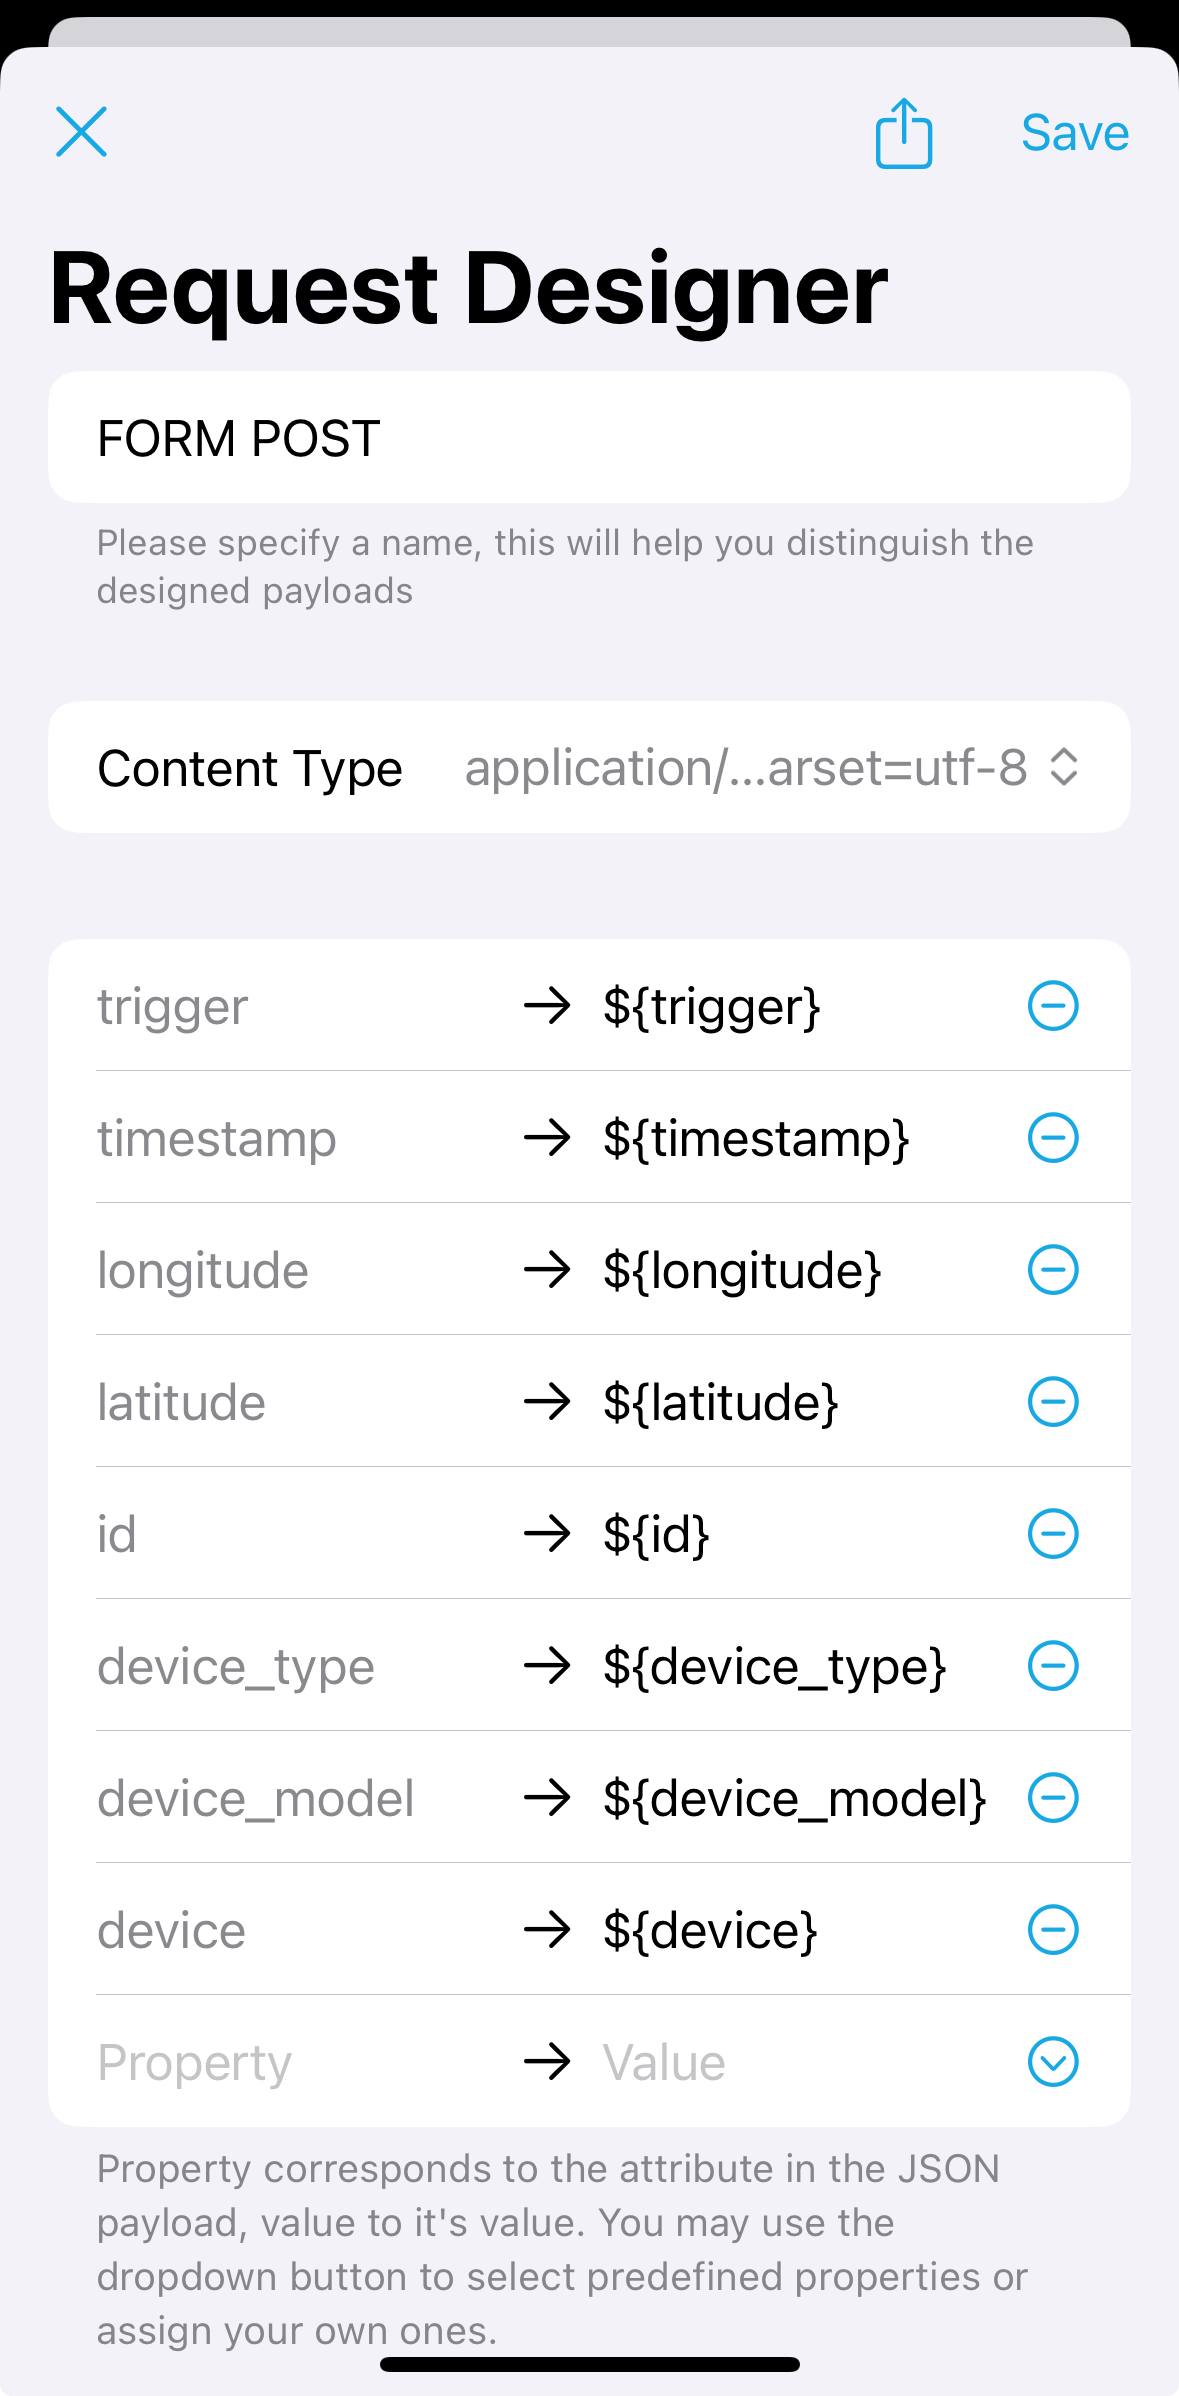
We also specify all the available fields here like with the JSON payload. One more setting in the Locative app (select the Settings tab at the bottom) - you should turn on the Send Payload as URL-Query when using GET-Method setting so that if you select GET you will get all the values as a query string which Indigo will also make available.
Update a Variable When Entering / Leaving Home
For our first example, we will create a simple JSON webhook that updates a variable when entering or leaving home. In other words, we're going to configure a webhook for a geofence that we will configure as "home-json". This webhook will catch the webhook enter and exit messages from Locative and update a variable named home. The value will come directly from the JSON payload described earlier.
Indigo configuration steps
On the Indigo side, we're going to create a variable called home and then add a webhook trigger that will catch the webhook from Locative and change the variable value to the value received in the trigger field. Here are the steps:
- Create a variable and name it "home" (or whatever you want)
- Configure a new Webhook Trigger action (select Web Server Event from Type and Webhook from Event).
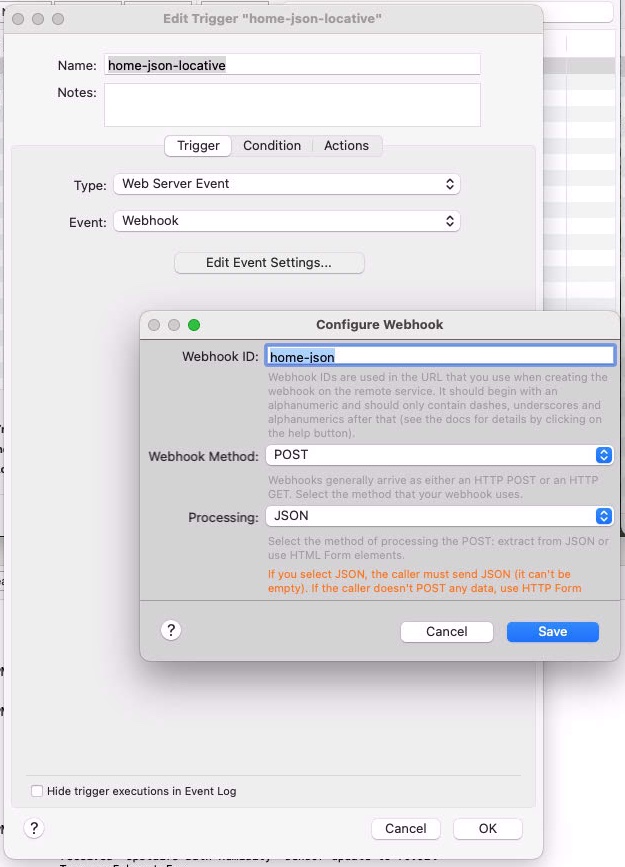
The Webhook ID field specifies the name of the webhook that you'll use on your URL. The Method is POST and the processing is JSON. Next, switch to the Actions tab and select Variable Actions->Insert Event Data into Variable from the Type popup, which will bring up the config dialog for that action:
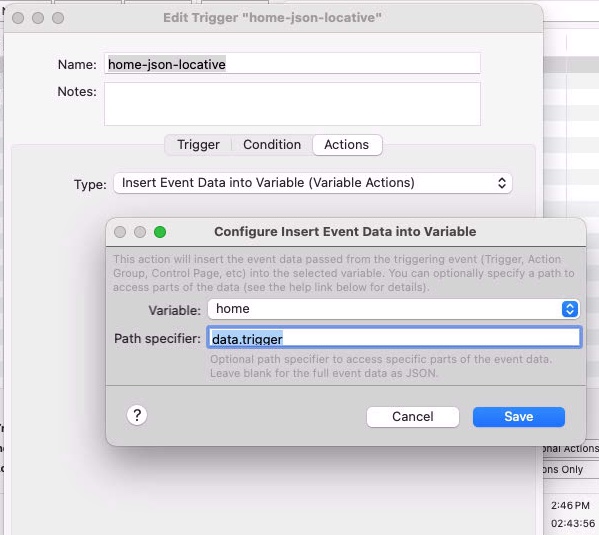
Select the Variable you created in step 1 above, then enter data.trigger in the Path specifier field. A brief reminder: this is what the event_data contains from a webhook trigger event:
event_data = {
    'data': {
        'device': 'YOUR-DEVICES-UUID',
        'device_model': 'iPhone15,2',
        'device_type': 'iOS',
        'id': 'home',
        'latitude': 30.25458515413769,
        'longitude': -97.76605401300928,
        'timestamp': 1759348496.39196,
        'trigger': 'enter'
    },
    'event-indigo-id': 264490832,
    'event-plugin-event-id': 'simpleWebhook',
    'event-plugin-id': 'com.indigodomo.webserver',
    'event-plugin-name': 'Web Server',
    'event-type': 'PluginEventTrigger',
    'http-method': 'POST',
    'http-post-content': 'JSON',
    'request-url': 'http://localhost:8176/webhook/home-json',
    'source': 'python',
    'status-code': 200,
    'timestamp': '2025-10-01T14:54:56',
    'webhook-id': 'home-json'
}
Note that the JSON data from Locative is stored in the data part of the event data dictionary, and the trigger event is in the trigger field, so we specify that as data.trigger.
Locative configuration steps
Create a new Geofence that represents your home (or whatever). Here's how the webhooks are configured in Locative:
You set the URL in both arrival and departure to this:
Change to your reflector name and add an API key at the end. Note the webhook ID that you set in the trigger definition is used as the last part of the path specifier (*home-json* in this case). Then select POST for both, then JSON (or whatever you named your definition).
Test your setup
We recommend enabling debug logging for the webserver (Indigo XXXX.Y->Advanced Web Server Settings... then click on the Debug Logging option). This will show you the traffic between Locative and Indigo. Then in the Locative app's Locations list, long press on your home location and select Trigger "Enter" Event and watch your Event Log window in Indigo.
You should see something like this:
Web Server Debug                caught webhook with ID: 'home-json'
   Web Server Debug                received webhook 'home-json-locative' with JSON data: {'longitude': XXXXX, 'device_type': 'iOS', 'id': 'home', 'latitude': XXXXXX, 'timestamp': 1759522339.223068, 'device': 'YOUR-DEVICES-UUID', 'device_model': 'iPhone15,2', 'trigger': 'enter'}
   Web Server Debug                webhook 'home-json-locative' message sent to subscribers:
{'webhook-id': 'home-json', 'status-code': 200, 'http-method': 'POST', 'request-url': 'http://localhost:8176/webhook/home-json', 'http-post-content': 'JSON', 'data': {'longitude': XXXXXX, 'device_type': 'iOS', 'id': 'home', 'latitude': XXXXXX, 'timestamp': 1759522339.223068, 'device': 'YOUR-DEVICES-UUID', 'device_model': 'iPhone15,2', 'trigger': 'enter'}}
Hopefully you'll see this and you'll see the value of the home Indigo variable set to enter. You can test the exit as well to make sure that your variable is getting updated correctly. You can disable debug logging once you've confirmed it's working correctly.
If you see an error about the webhook being undefined or you see a Not Found (404) error, you may need to restart Indigo.
Summary
In summary, we created a geofence in Locative that represents your home and configured it to send a JSON webhook to Indigo, where we catch the webhook and update a variable with the trigger value, either enter or exit which represents your iOS device arriving home or leaving.
Update a Variable When Entering / Leaving Work
For our second example, simple FORM POST and GET webhooks that update a variable when entering or leaving work
Next, we are going to create a similar solution for work, but instead of using JSON and a single webhoook to catch both enter and exit calls, we'll create two separate webhooks. One will catch a FORM POST, and the other will catch a GET. Under most circumstances, you wouldn't need to do this, but for the purposes of this example we wanted to show you how to do both of these.
Using the first example as a starting point, we'll first create the Indigo elements.
- Create a "work" variable.
- Create a webhook trigger we'll call
work-form-postwhich will have a webhook ID ofwork-formand which usesPOSTandHTTPForm for method and processing respectively. For the action we will configure another insert event data action for your newworkvariable, but this time you'll use the following path specifier:data.trigger[0]. Now, you're probably wondering why the[0]is appended to the end: this is because FORM POST (as well as GET query) args are always a list because you can have multiple duplicate field names with different values in those methods. But we know that Locative only sends a single value so we just get the one at the 0 index (the first one, Python lists are 0-based, so the first element is 0, second is 1, etc.) - Just like above we'll create a webhook trigger we'll call
work-getwhich will have a webhook ID ofwork-formand which usesGETfor the method. Configure an identical action as above to insert the value into the variable you created in step 1.
Next, in Locative, create a location just as before (except for your work). For this one we'll have two different URLs and methods defined for the Arrival and Departure webhooks.
For Arrival, you'll want to set it to POST and use the following URL (with appropriate substitutions):
For Departure, select GET and use the following URL (with appropriate substitutions):
Select your FORM POST custom design for the custom request field as illustrated above.
Test and debug your solution to make sure that your work location is updating correctly when entered/exited.
Summary
For the work location, we used two different webhooks (a GET and a FORM POST) to catch data from Locative. Both webhooks update the same variable with exit/enter just like the first example. We artificially created these scenarios to illustrate how GET and FORM POST works in case you have a data provider that uses those methods.
Advanced Scripting Example
As you can see from the two examples above, Indigo is quite flexible when it comes to configuring webhooks and using the data provided by them. But there are other ways to customize your solution to fit your needs. Let's say what you really want Indigo to know is when you (for this example, we'll call you Joe) are at home, at work, or some other place (which we'll just call away). For this example, we're just going to have a single webhook which will catch all the webhooks and have a script that uses the data from the webhook to determine where you are. We'll then change the value of a variable to home, work, or away
First, let's create the Indigo webhook. Here's the trigger definition:
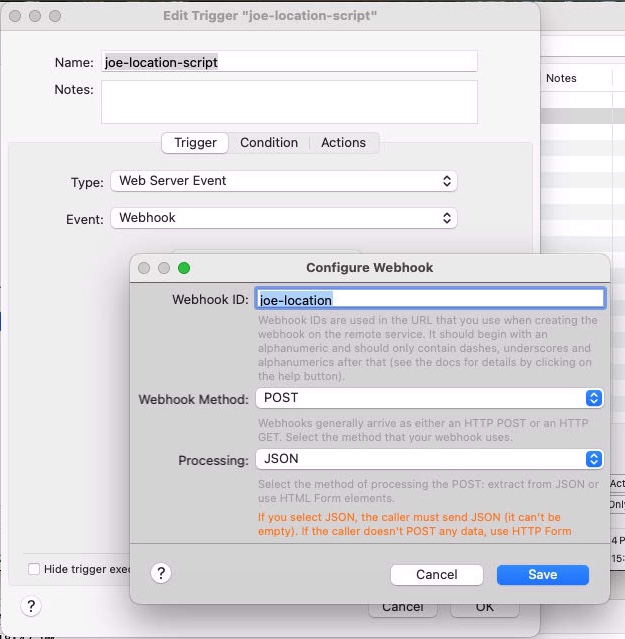
It's a straight-forward JSON POST webhook named joe-location. The action is where the real work is. Select the Server Actions->Script and File Actions->Execute Script, with the following script:
# Get the location ID and the triggering event from the
# locative webhook data
location_id = event_data["data"]["id"]
location_trigger = event_data["data"]["trigger"]
# The default value will be "away"
joe_location = "away"
if location_id == "joe-home":
    if location_trigger == "enter":
        # The location was home and enter, so joe is
        # home
        joe_location = "home"
else:
    # We only have 2 locations that execute this webhook
    # so it must be the work location
    if location_trigger == "enter":
        # The location was joe-work and enter, so joe is
        # at work
        joe_location = "work"
# Update the variable with one of ["home", "work", "away"]
# Substitute the ID of the variable that will hold your location
indigo.variable.updateValue(IDOFVARIABLE, value=joe_location)
In Locative, create two different locations, one with an id of "joe-home" and another with an id of "joe-work". For each, configure all the webhooks as POST JSON using the following url:
All webhooks for both locations will go to the same trigger in Indigo and the script will process it based on the data present in the webhook JSON. Give it a try and debug as necessary.
Summary
We created a single Indigo webhook that catches a JSON payload and in an embedded script it uses data from the payloads to determine where Joe is. We also created two locations in Locative that represent home and work, and configured the webhooks for both locations to hit our single webhook trigger and pass through their data.
Synology NAS Webhook Example
Synology DSM supports webhook events and they work great with Indigo's Webhook Events. This document describes how to set up a Synology DSM webhook event (sender) and Indigo webhook event (receiver). It assumes a certain level of familiarity with both Synology DSM Notifications, Indigo Webhook events and Indigo authentication. There are many configurations that are possible and this article describes a very basic example.
Setting Up Indigo Webhooks
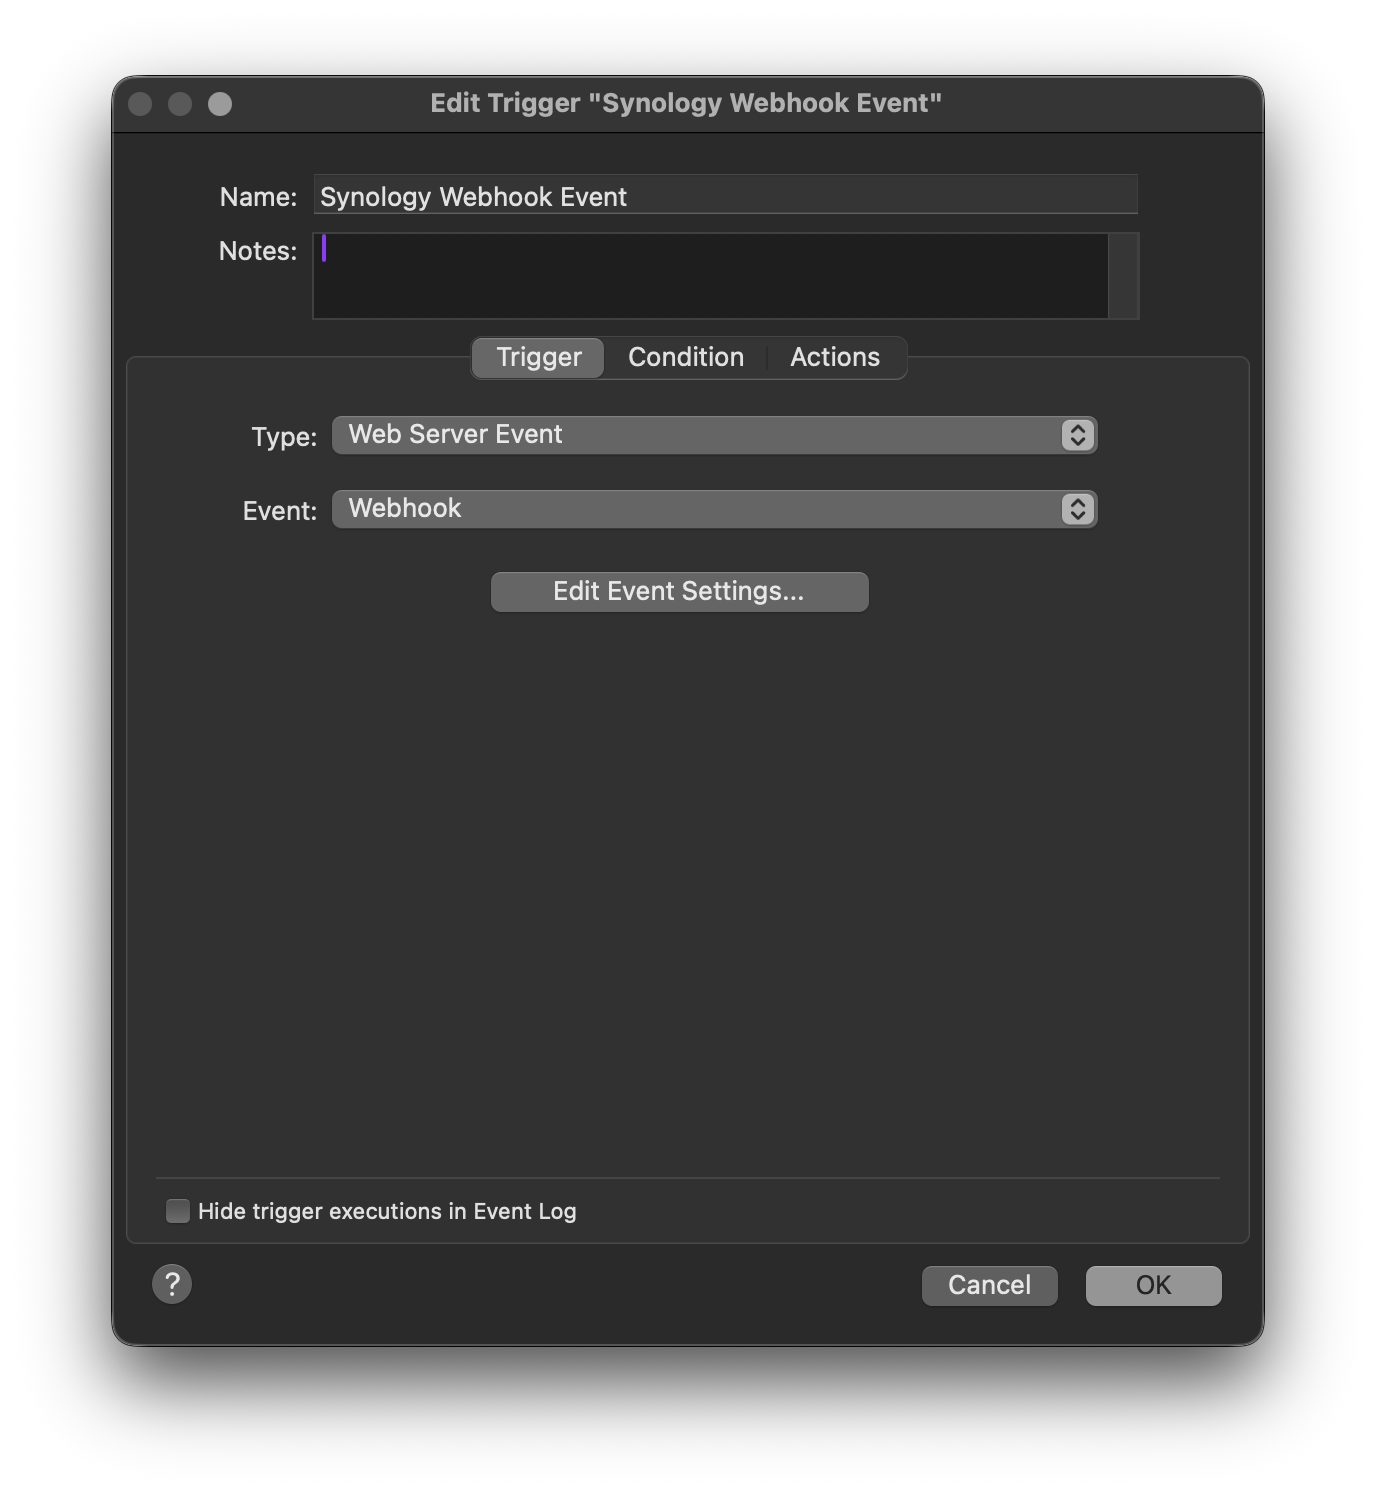
- In Indigo, create a new Trigger.
- Under Type, select Web Server Event.
- Under Event, select Webhook.
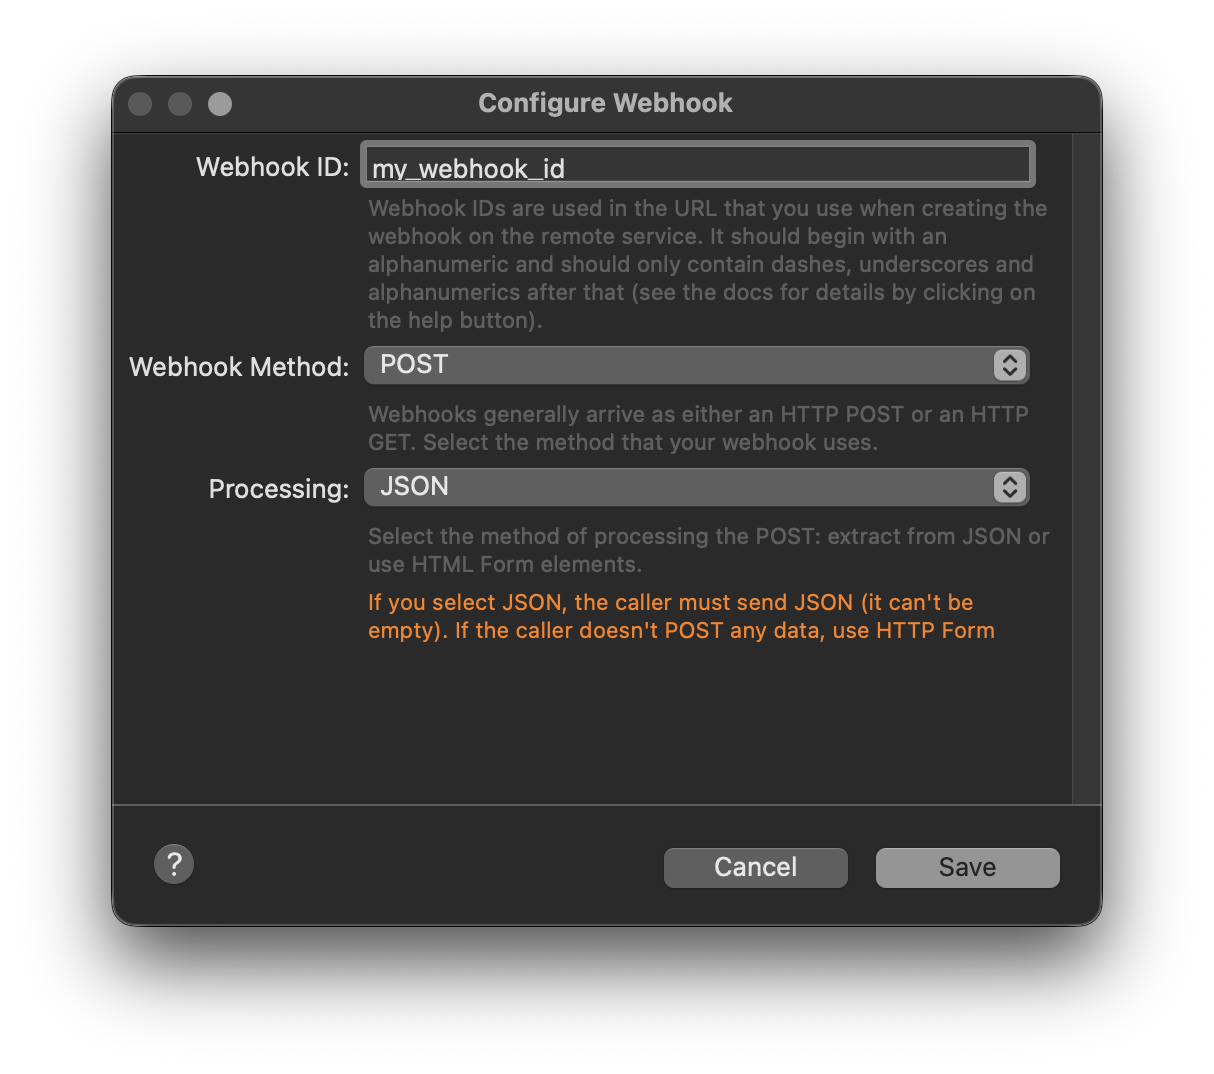
- Under the Configure Webhook dialog, copy the Webhook ID and paste it somewhere safe. If you want, you can change the ID to something else -- it must be unique.
- Under Webhook Method, ensure it's set to POST.
- Under Processing, ensure it's set to JSON.
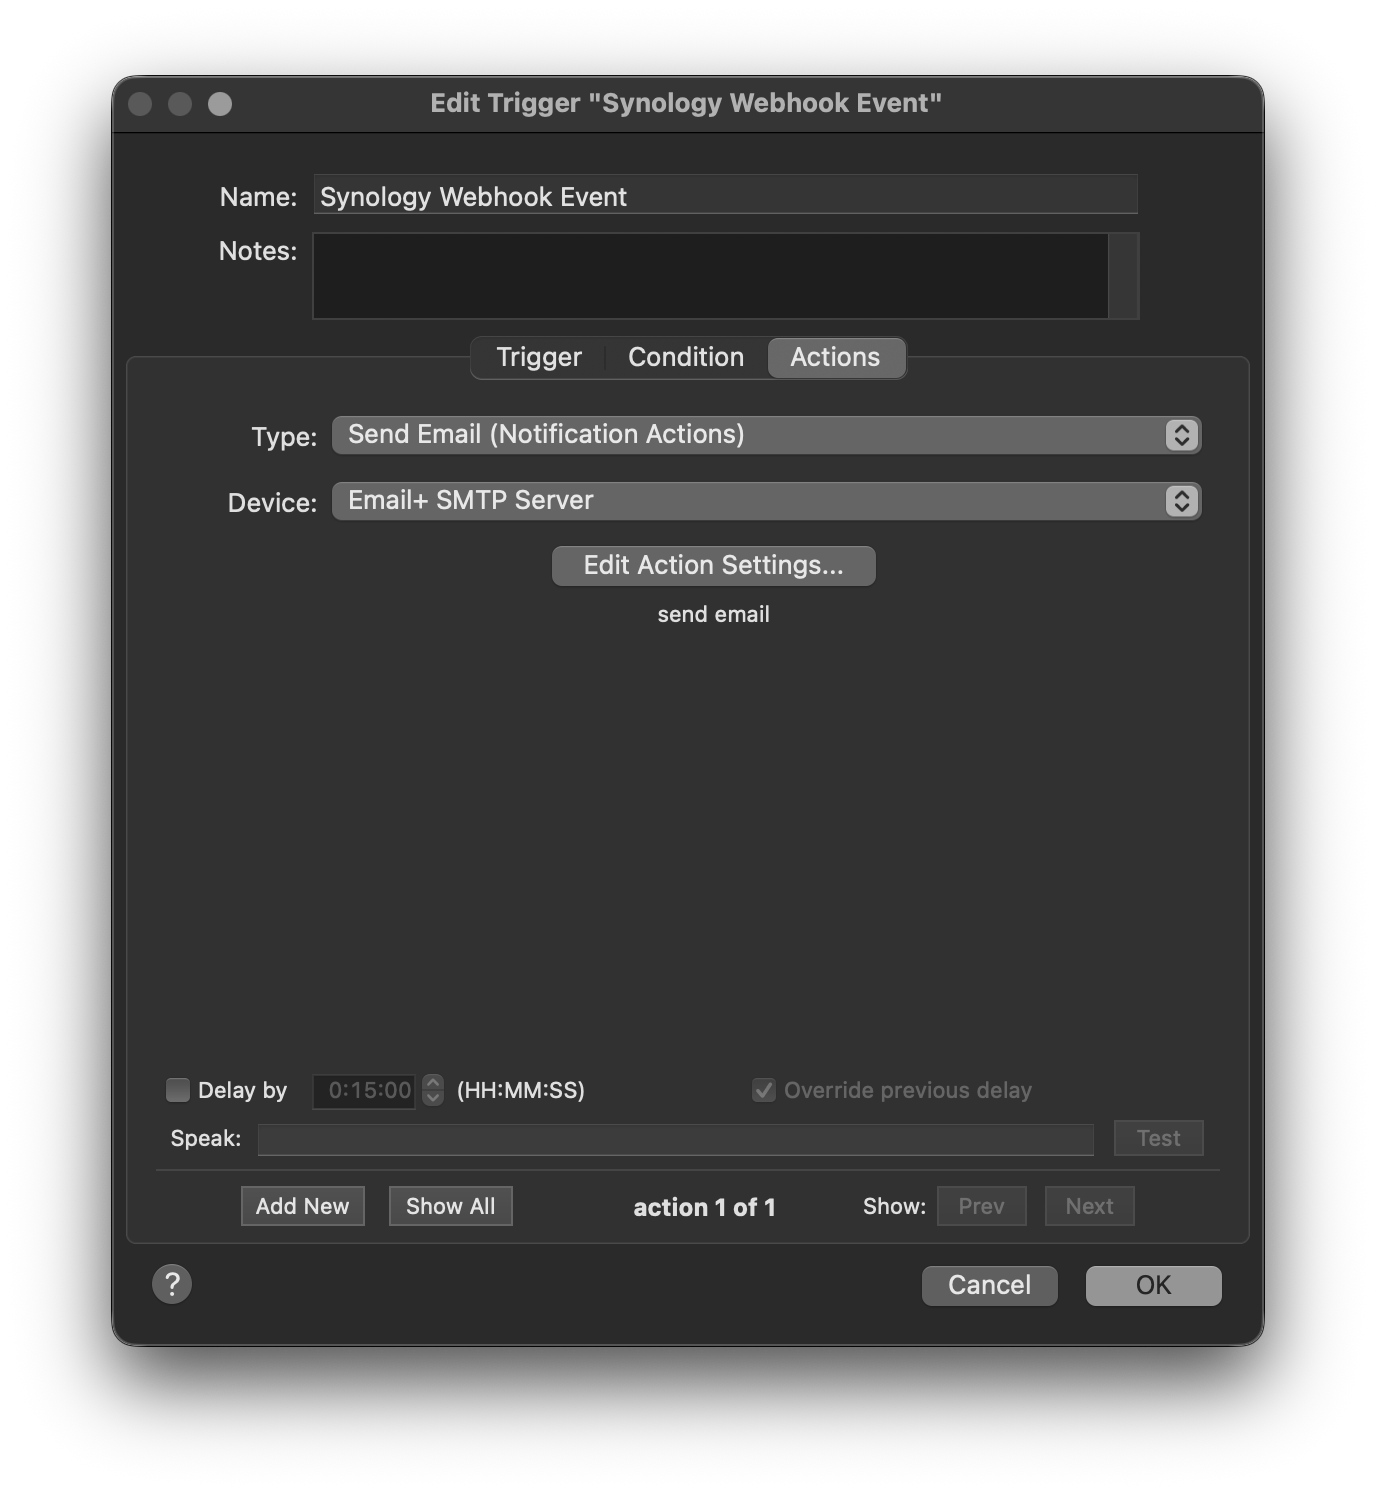
- Set up the Action for your Indigo Trigger (send an email, write to the event log, etc.)
- Save your Trigger.
Setting Up Synology DSM Webhooks
- Log into the Synology NAS administrative dashboard.
- Open the Control Panel app.
- Select Notification.
- Select Webhooks
- Click the "Add" button to add a new webhook.
- Choose a Notification Rule, enter a Provider Name, and Subject
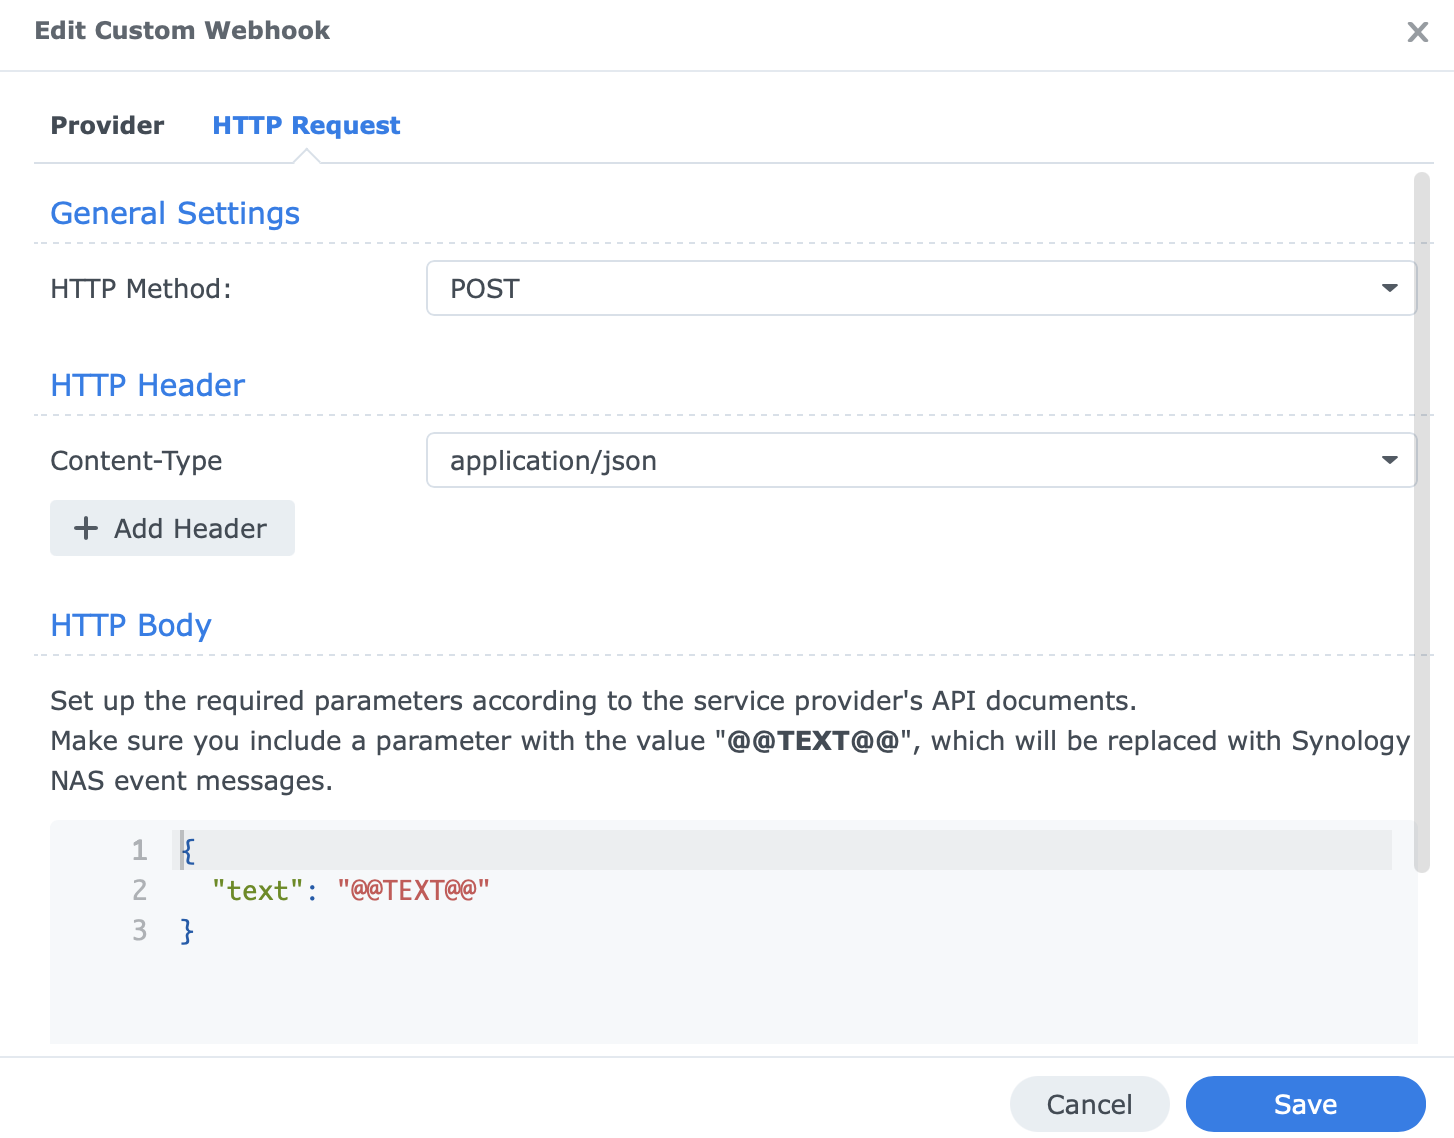
- Enter the configured webhook URL which should have a form similar to this:
https://MY_REFLECTOR_NAME.indigodomo.net/webhook/MY_INDIGO_WEBHOOK_ID?api-key=MY_INDIGO_API_KEYwhere you replaceMY_REFLECTOR_NAME,MY_INDIGO_WEBHOOK_ID, andMY_INDIGO_API_KEY with values from your Indigo setup. Use the webhook ID you got from the Indigo Webhook Trigger. For the API key, you can also use a local secret. - Click Next (or switch to the HTTP Request tab).
- Adjust the request as needed -- can leave at defaults for your first webhook.
- Save your webhook.

Test Your Webhook
- Select your new Synology web hook if it's not already selected.
- Press the "Send Test Message" button.
- Confirm the webhook worked (depends on the Action options you chose above.)
An example event log success message:
Trigger Synology Webhook Event
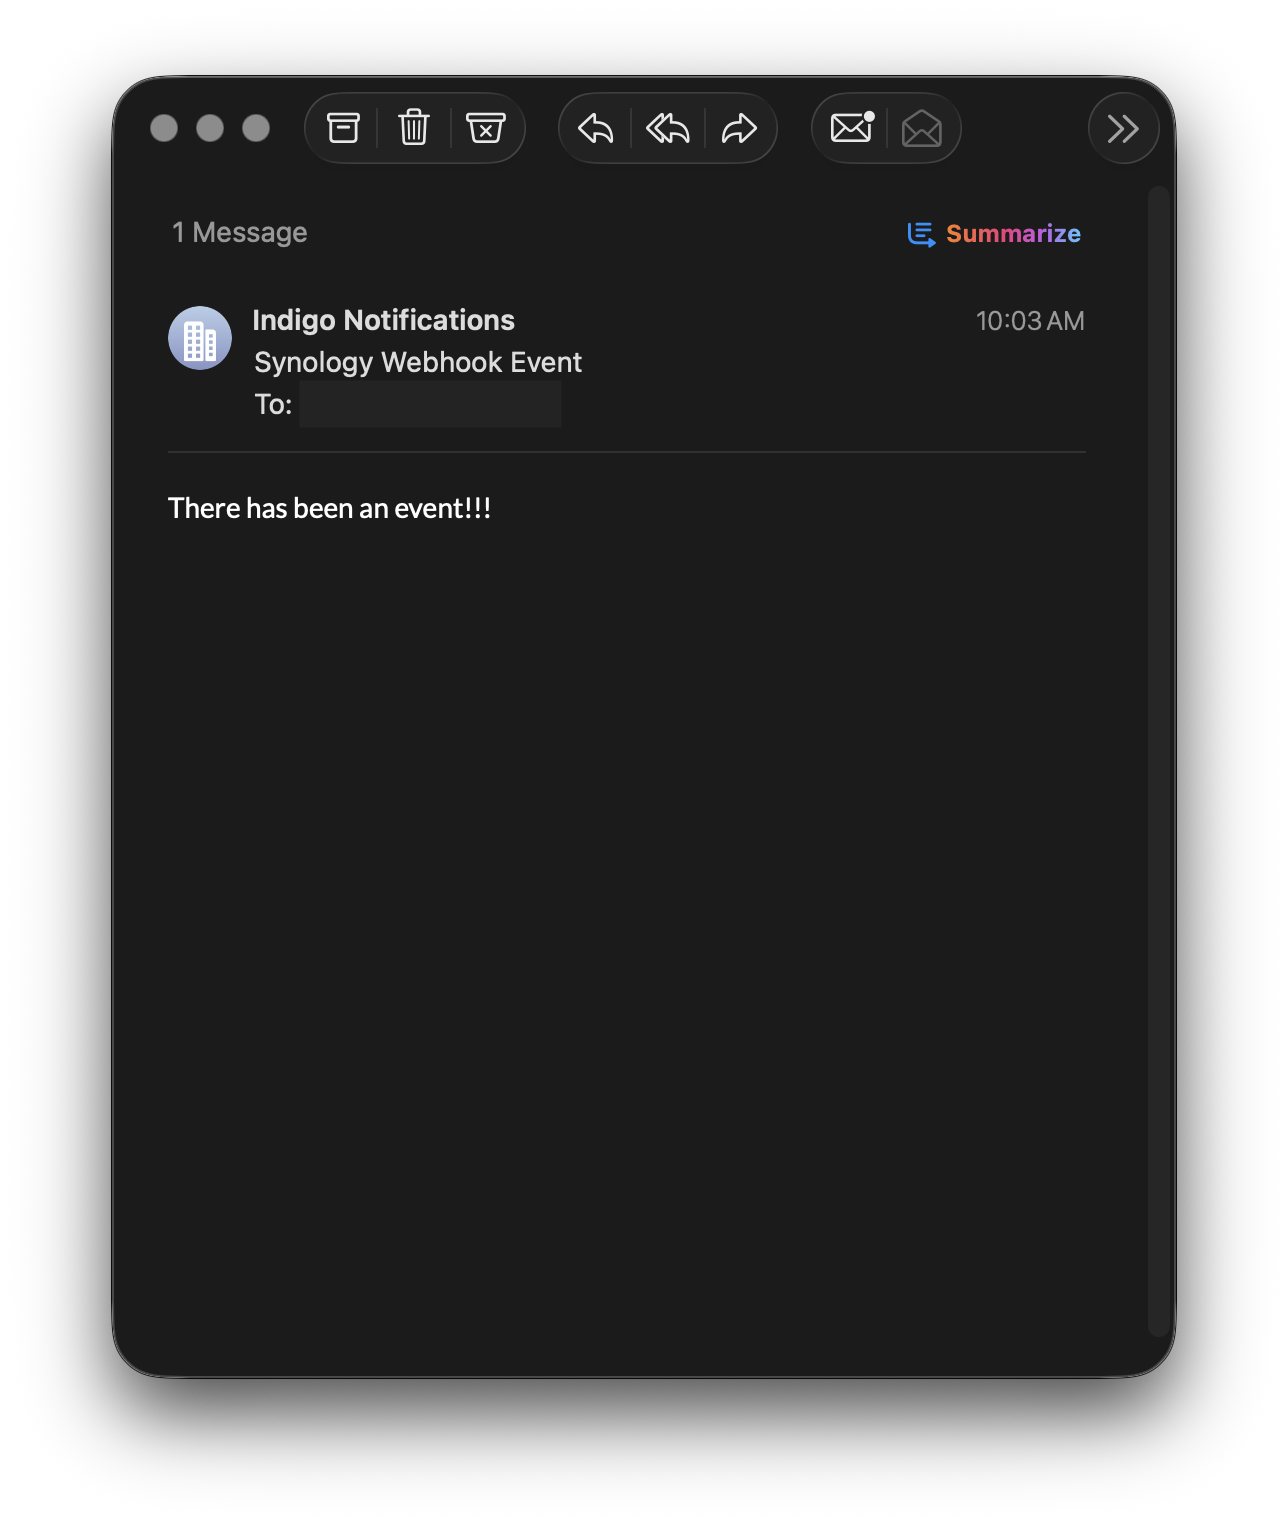
Email+ sending email 'Synology Webhook Event' to 'me@me.com' using Email+ SMTP Server
And the notification!
Customize Your Webhook Event
Now that you've confirmed that your Indigo Webhook event is working properly, you can customize it to make it even more useful. Because we've selected a POST event, the Synology DSM webhook will pass DSM event data to Indigo. You can use that payload to take different actions. When an Indigo POST web hook is triggered, it includes the payload that was POSTed. You can access this payload with a Python script. The payload is sent as JSON, so you can access the DSM event information by working with the event_data payload that's sent to the trigger. See the Webhooks Page for more information.