Getting Started
In this article
This guide walks you through everything needed to get Indigo running: verifying Mac requirements, connecting hardware interface devices, adding your first Z-Wave, Insteon, or X10 devices, and creating basic automations. Read through all topics in this section before setting up your system to understand the full scope of what's required.
Welcome to Indigo 2025.2!
Indigo is a powerful Mac-based home control server that integrates an assortment of popular Z-Wave®, Insteon and X10 hardware devices, as well as a variety of other hardware via 3rd party plugins, to provide monitoring and control of your home. Depending on your needs and budget, you can create a simple system that controls only a couple of lights or you can automate your entire home.
We recommend that you read through all of the topics in this Introduction section to get a firm grasp of the pieces required to begin your home automation experience.
Indigo Software and Mac Requirements
To install the Indigo software, you'll need a Mac that meets these OS and hardware requirements:
Indigo requires you to leave your Mac running all the time (though the display can go to sleep) in order to control your home automation; you should take this into consideration when choosing a location for your Mac.
Indigo Home Automation Technology Support
The other major piece of the home automation puzzle are the devices that you want to control. Lights, thermostats, sprinklers, door locks, motion sensors, alarm panels, A/V equipment, etc. Indigo supports a large variety of these devices. Check out our database of devices that have been tested with Indigo (including via 3rd party plugins).
Out of the box, Indigo supports the following Home Automation protocols (simultaneously) via separate Interface Hardware devices:
Z-Wave
Z-Wave is a very popular home automation technology that's used worldwide. There are many different manufacturers of Z-Wave devices so the selection is quite good. To use Z-Wave with Indigo, you'll need a Z-Wave interface (often referred to as a dongle): Indigo supports Z-Wave via a variety of Hardware Interfaces.
The types of Z-Wave devices that Indigo currently supports include:
- ON/OFF devices (plug-in modules, switches, and outlets),
- Dimmers (plug-in modules and switches),
- Sensors (contact, magnetic, motion, temperature, etc.),
- Thermostats, and
- Locks.
Other device types will be added over time. Check our Compatible Devices list to see if a specific module has been tested. Note however that just because a module isn't listed doesn't mean that it won't work - Z-Wave is architected such that devices that correctly support Z-Wave features should automatically work. There are so many different devices from many different manufacturers that we will never be able to test them all. If you have a device that isn't listed but works, please feel free to report it to us and we'll add it to the list. There is a very simple mechanism to report devices, described in Editing a Z-Wave Device's Properties towards the end of that section.
Insteon
Insteon is a protocol developed by SmartLabs, parent company of Smarthome.com, which is widely used in North America and is moving into other markets as well. There are a few 3rd party vendors that make Insteon hardware but most devices are made by SmartLabs. To use Insteon with Indigo, you'll need an Insteon interface. You can find a complete list of Insteon interfaces that are supported on our Built-in Interface Hardware Support list. Indigo supports the vast majority of Insteon devices - see our Compatible Devices list for a complete list.
X10
X10 is a legacy technology that works primarily over the power line though some devices are wireless (using the X10 RF protocol). We don't recommend anyone start a new home automation system using X10 because of its poor reliability and relative lack of X10 hardware - however, if you have existing X10 devices you can definitely use them with Indigo if you have a compatible X10 interface. You can find a complete list of X10 interfaces that are supported on our Built-in Interface Hardware Support list.
Other Devices
If you don't have any of the above hardware, you can still install and use Indigo - particularly if you have hardware supported by one of the many 3rd party plugins. For instance: RFXtrx433 with support for Home Easy/Chacon, X10 RF, LightwaveRF, and many different types of sensors; Ecobee and a variety of TRV Thermostats; Alarm Panels; A/V equipment; etc. See our Plugin Store for all available 3rd party plugins. Indigo also ships with some useful plugins out of the box. Some plugin developers have reported devices that have been tested with their plugin and Indigo: see our Compatible Devices list for those devices.
Other Sources for Help
For specific questions or discussions on the hardware above, we recommend you join us on our online forum.
You can also visit our website for valuable support resources:
- The FAQ has answers to the most common questions
- Add lots of extra functionality via 3rd Party Plugins available in our Plugin Store
- Visit our User Contribution Library to download the latest plugins, scripts, and icons/graphics for extending Indigo
Now, you know what the parts of your system will be and where to go for more information and help. Now let's get started with the actual installation.
Installing Indigo
Indigo can run as a standalone application on a single Mac or can be run in a client/server mode on two or more Macs. In either case, you must first run the Indigo installer on the main Mac (also referred to as the server Mac) to which the home automation interface hardware (Z-Stick, PowerLinc, CM15, etc.) will be connected. Just download the latest Indigo installer (you must be logged in to your Indigo Account to see the downloads available to you). This should download the disk image. In Safari, click the downloads button (the down arrow to the right of the URL/search bar). You should see an entry titled "Indigo.dmg". Double-click the installer file to switch to the Finder. A dialog will show the disk image is being mounted. Once it's mounted, a window will open with the following files:
- A ReadMe.html file - read this for any late breaking information about Indigo or the installation process.
- The Indigo Installer.pkg file - double-click this to start the Indigo installation. Follow the instructions provided by the installer. On the Installation Type screen, press the Install button (do not use Customize) to install all the Indigo packages (Server, Server Scripts, Drivers, and Client) on your designated hard drive. Note: you must install and run Indigo from an account on your Mac that has administrator privileges.
Location of Indigo Files after Installation
The Indigo 2025.2 application can be found here:
/Applications/Indigo 2025.2.app
And the Indigo database files, log files, scripts files, and other settings/support files are stored in:
/Library/Application Support/Perceptive Automation/Indigo 2025.2/
By default, database files are stored in the Databases folder in that folder.
Note
This is the Library folder at the top level of your hard drive, not the one in your User folder. Lion and greater hide these folders by default, but if you select the Go->Go to Folder… menu item in the Finder and paste in the path above it will open that folder in a Finder window.
Installing Indigo Client on another Mac (optional)
If you have only a single Mac, then your installation is now complete and you are ready to start Indigo. However, Indigo has been designed as a client/server application to allow remote control and configuration from anywhere (*extra network configuration is required if you want to access your server from a client over the Internet and is outside the scope of this manual - post on the online support forum for assistance). The client-only installation process installs only the files needed to remotely access the primary Indigo server running on your main Mac.
- Copy the Indigo Installer.mpkg file to your other Mac.
- Double click the Indigo Installer.mpkg icon to start the Indigo installation.
- Follow the instructions provided by the installer process. On the Installation Type screen, press the Customize button and then deselect all the package options (Indigo Server, Indigo Plugins, Indigo Server Scripts, Indigo Drivers) except for the Indigo Client package.
- Press the Install button to install just the Indigo Client package.
- Note: It is not necessary to restart your Mac after installing the Indigo Client package only.
If you have other Macs on your home network, then you can optionally repeat the above Indigo Client installation on each of them.
Now you can start Indigo and configure the server, and then remotely control Indigo from your iPad, iPhone or iPod Touch using Indigo Touch, a Web browser or the Indigo Client.
Starting Indigo Server
Indigo can run as a standalone application or can be run in a client/server mode. The latter allows the server to run invisibly in the background without the client application UI showing and is the recommended option. Regardless of which you are doing, the first step after installation is to launch Indigo and configure the local server.
- Double click the
Indigo 2025.2application (/Applications/Indigo 2025.2.app). - If this is the first time to run
Indigo 2025.2on this Mac, then press theStart Local Server...button in the connection status window. - If you want to reconfigure the Indigo Server on a Mac already running Indigo, then select the
Indigo 2025.2->Start Local Server...menu item.
Password Field Behavior
The length of the entry in the password field does not reflect the length of the actual password entered. This is intentional and is meant to add a layer of security so a bad actor can't guess the true password's length.
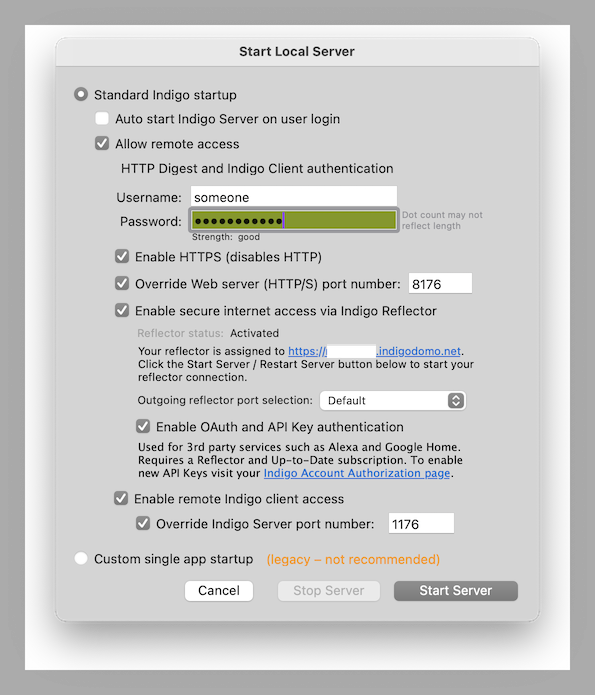
Standard startup mode
Choose the Standard Indigo Startup radio button to start the Indigo Server process independently of the Indigo Client. This will allow the server to run in the background on your Mac with no visible UI, even when the Indigo Client is not running. This will also start the built-in Web server, allowing remote access from Web browsers on other computers and remote access from iPhones and iPod Touches.
Use the Auto start Indigo Server on user login checkbox to have the Indigo Server automatically launched whenever your current OS X administrator user account is logged in. This option will also make sure the Indigo Server process is automatically relaunched if it crashes.
Use the Allow remote access checkbox to enable remote access from other Macs and Web browsers. You must enter a username and password if you enable remote access.
Use the Override Web server port number: checkbox to change the TCP/IP port number that the web server uses to serve content and browsers will use to browse the web control pages.
Use the Enable secure internet access via Indigo Reflector checkbox for secure Web browser access from anywhere. This option requires a you to have configured a Reflector, which handles maintaining the secure connection to Indigo Server automatically. Reflectors are included as part of your Up-to-Date subscription.
Outgoing reflector port selection: Some ISPs, especially satellite providers, may block incoming and outgoing connections -- particularly if they sit idle for a time (which, in our opinion is ridiculous) -- this setting provides a few options to hopefully work around these limitations. The setting you choose does not have any impact on performance. Further, the reflector port selection (or, in fact, the reflector itself) should have no impact on local web traffic performance (since the reflector isn't involved when a local network connection is made). If you're experiencing slowness with a local connection, check your router to ensure it isn't blocking or otherwise interfering with Bonjour traffic.
Use the Enable OAuth and API Key authentication checkbox to enable 3rd party services like Alexa. It also will allow REST API calls to use an API key for authentication rather than a username/password. This is more secure since you can revoke a key if it gets compromised without having to change passwords in wherever you may need to use them.
Use the Enable remote Indigo client access checkbox to allow remote Indigo Clients on other Macs to connect to the Indigo Server. Note that this only works on your local network - the Indigo Reflector service is only for Indigo Touch and other web access, not for configuration client connections.
Use the Override Indigo server port number: checkbox to change the TCP/IP port number that the Mac OS X client uses to connect to the server.
Custom single app startup
This is a legacy setting and should only be used if instructed by Indigo Customer Support.
Starting the Server
Press the Start Server button, or the Restart Server button if the server is already running, to start the local Indigo Server. If Allow remote access is enabled, then the built-in Web server will also be started.
The Indigo Client will automatically connect to the Indigo Server. If this is the first time to launch the Indigo Server on this Mac, then you will be prompted to accept the License Agreement and to enter your Registration Code. The Indigo Client will then load and display the current house database file.
If you are running in client/server mode, then you can quit the Indigo Client at anytime and the Indigo Server will continue to run in the background processing your home control logic and schedules. Additionally, you can remotely access the Indigo Server from Indigo Clients on other Macs or from remote Web browsers that have internet access to the server Mac.
If you are running in standalone mode, then quitting the Indigo Client will automatically quit the Indigo Server.
If this is the first time you've started the server, you'll be prompted first to click through our End User License Agreement (EULA), then you'll see the Indigo Account Log In dialog:
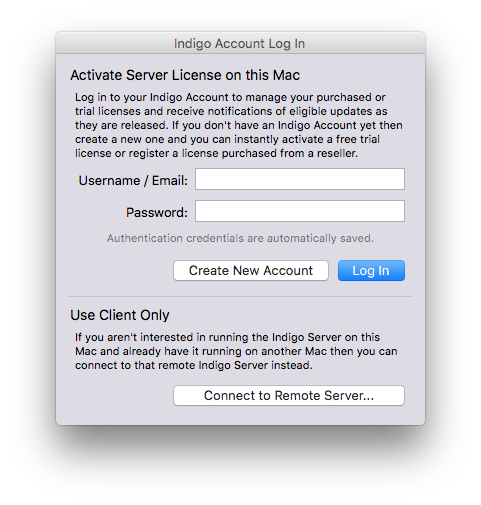
and enter your Indigo Account username (or email) and password. The server will then continue to start up.
If you purchased a retail license from a reseller, you must follow the directions supplied by your reseller. It may be in an email or they may include a printed sheet with your shipment. Usually this will just tell you to create a new Indigo Account (click the Create New Account button) and fill out the form.
If you just want to run the client and connect to a server on a different Mac, then click the Connect to Remote Server... button.
Backing Up Indigo
Backing up your Indigo installation is very simple: just make sure that your backup program is backing up this folder:
/Library/Application Support/Perceptive Automation/
Note: this is the Library folder at the top level of your hard drive, not the one in your User folder. Use the Go->Go to Folder... menu item in the Finder and paste in the path above to get there easily). Another thing to note is that it's possible that you've stored your database in a non-standard location, like for instance the Documents folder in the home folder for the account under which Indigo is installed. If that's the case you'll need to make sure that you've backed it up as well. You can tell the location of your database file by Command-clicking the database name in the title bar of the Home Window.
Time Machine will do this by default. To recover, just recover that directory and then run the Indigo 2025.2 installer again (which will repair any permission issues that Time Machine may have introduced).
General Configuration Settings
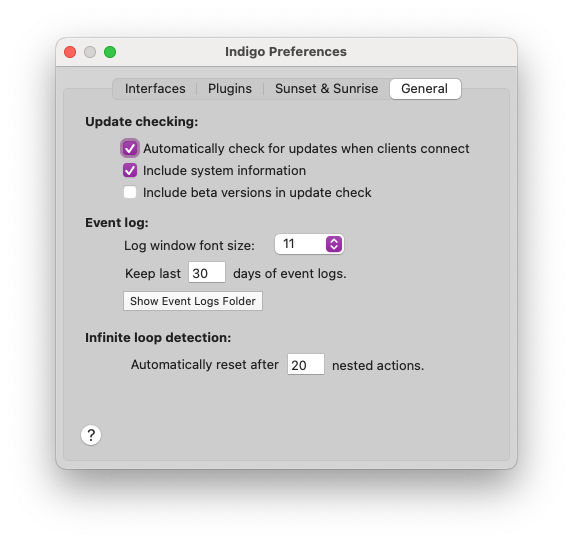
You can configure other Indigo settings by opening the preferences dialog (selecting the Indigo 2025.2->Preferences... menu item) and clicking on the General tab.
The first section of the tab is about update checking. The first checkbox will have the client check with our servers to see if there's an update to Indigo available when the client first starts up. If there is, it will let you know. The second checkbox will send anonymous information to us (and it really is anonymous) about your install - this helps us to better prioritize what future enhancements to add. The last checkbox will also check to see if there's a newer beta version available - if you aren't interested in getting betas then leave it unchecked.
You can have Indigo check for updates immediately by selecting the Indigo 2025.2->Check for Updates... menu item.
The next section we talked about above - how many days of event log files to keep.
The last section is a rather technical configuration parameter - it is possible to get into an unending (infinite) loop when you're setting up your triggers. For instance, if you have a trigger the fires on a variable change, and it changes the variable to some new value each time, that would cause the trigger to fire again. Setting this value will cause it to stop eventually. Leaving it set to 5 is probably the best idea.
Specifying your Latitude and Longitude
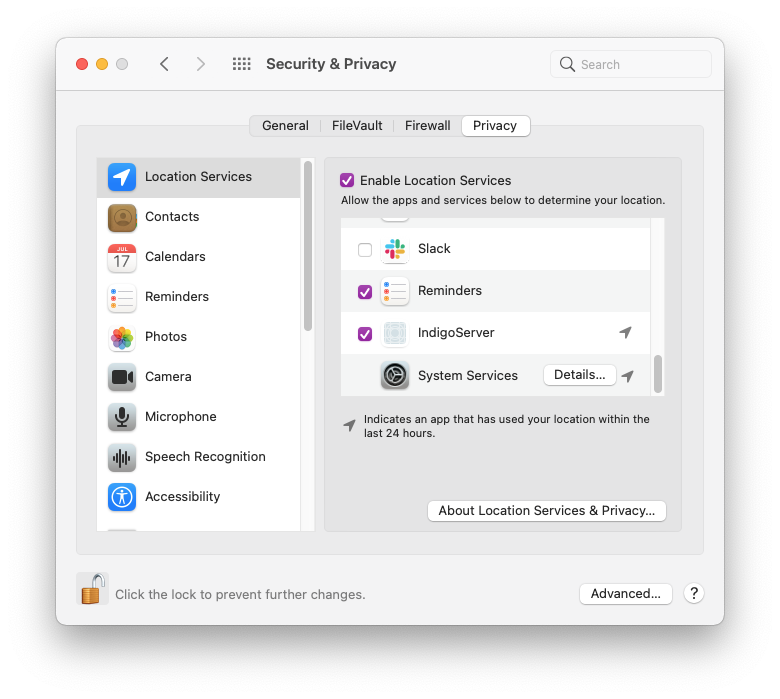
Indigo uses your current Latitude and Longitude coordinates to calculate precisely when sunset and sunrise will occur every day. Indigo automatically extracts your location from the System Preferences. To do this, it must have access to Location Services on your Mac (and WiFi must be turned on for Location Services to work). When Indigo first launches, you'll be prompted to allow access to Location data. If for some reason it's not working, check the Location Services section on the Privacy tab of the Security & Privacy section of your System Preferences and make sure that IndigoServer is enabled (has a checkbox beside it).
Configuring your System Location
- Choose
System Preferencesfrom theApplemenu. - Select the
Date & Timeicon. - Select the
Time Zonepanel. - If the current
Closet Citylocation is not near your location, then follow the instructions on the panel to choose your location. If you would like to precisely specify your location, then you can override the system location from within Indigo.
Overriding the System Location
By default, Indigo will use Location Services to determine the location of your Mac. You will be asked the first time you start your server to grant permission for IndigoServer to access you Mac's location. If Indigo doesn't seem to be running schedules at the right time, make sure that Indigo is authorized to access Location Services. Open the System Preferences, select the Security & Privacy preference, click on the Privacy tab and you should see IndigoServer in the list - make sure the check box beside it is enabled:
You can, however, manually specify the latitude and longitude:
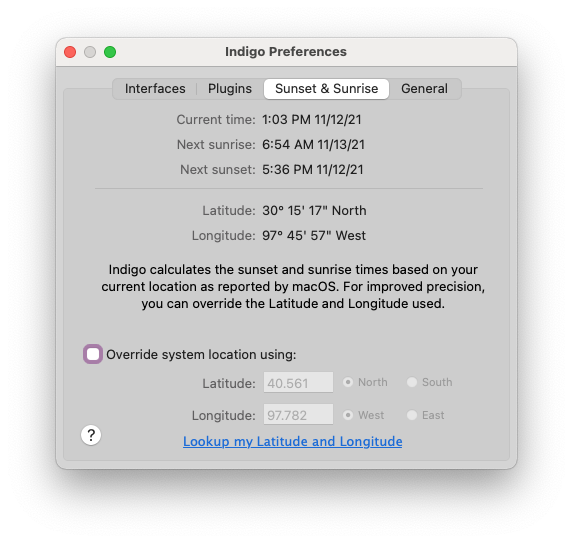
- Choose the
Indigo 2025.2->Preferences...menu item, then make sure theSunset & Sunrisetab is selected. - Select the
Override system locationcheckbox. - Enter your exact
LatitudeandLongitudecoordinates.
Modifying System Settings for Continuous Operation
Indigo requires your Mac to be on and awake for processing. You can, however, set the display to go to sleep: the Indigo Server will not need the display to be active to function.
Remote Indigo Access
After you have started the Indigo Server in client/server mode, you can remotely access it from other Macs using the Indigo Client, from your iPad, iPhone or iPod Touch using Indigo Touch, or from any modern Web browser (Safari, Firefox, Opera).
The following steps explain how to access the Indigo Server from within the local area network (LAN) of your house. Configuring your network to allow Indigo Server access from outside your home (on the other side of your router/cable modem) is more complex and will depend on your network topology, router type, and ISP features (static versus dynamic IP addresses). For this reason, we are only providing instructions on how to get local (in house) remote access to Indigo Server.
If you desire easy remote Indigo Server access from outside your home, then you will want to activate the reflector that's part of your Up-to-Date subscription. This provides secure Indigo Touch access from anywhere with no network configuration needed. As long as your Up-to-Date subscription is active you'll have remote access.
Alternatively, you can configure your network by consulting your router user manual and, if your ISP does not provide a static IP address, using a dynamic DNS mapping service like DynDNS.com. Because of the potential complexity involved in manually configuring networks and routers for this type of access, Perceptive Automation cannot provide direct support answers about router port forwarding or IP discovery issues. Users having difficulty configuring their networking hardware should post on the online support forum. Be sure and include details about the type of hardware you have and what steps you have tried.
Managing the Built-in Interfaces
Indigo has 4 built in interfaces: Z-Wave, Insteon, X10, and Virtual Devices.
You manage them from the Interfaces menu:
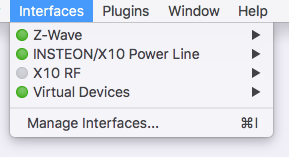
The first thing you'll notice is the dot beside the names in that menu. A green dot means that the interface is enabled. If the dot is gray, it means that it's disabled. This allows you to see what's enabled by just looking at the menu. Each interface (and its submenu) is described below. If you select the Manage Interfaces... menu item, it will open the Preferences dialog with the Interfaces tab selected:
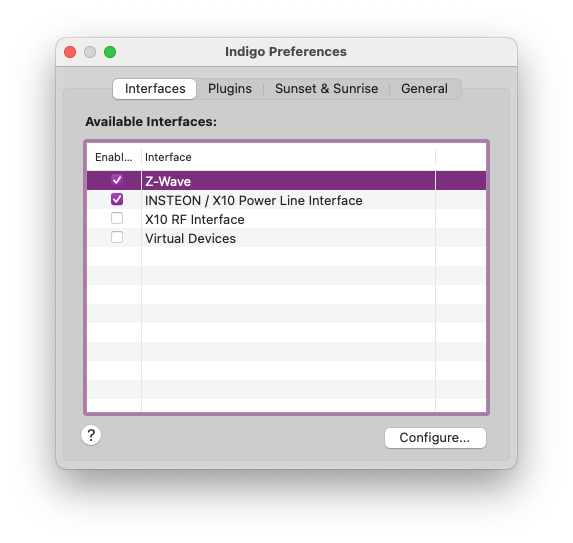
You can enable/disable an interface just by clicking the checkbox (rather than selecting the Enable/Disable menu item on each interface's submenu). Likewise, if an interface has any configuration options, you can open those dialogs by selecting the interface and clicking on the Configure... button (rather than selecting the Configure... menu item on each interface's submenu).
For detailed information specific to the interface, look to the appropriate guide for the technology:
- Configuring and Managing your Z-Wave Network
- Configuring and Managing your Insteon Network
- Configuring and Using X10 devices
- Using the Virtual Devices Interface
Managing Plugins
Indigo includes the ability to use plugins developed by 3rd party developers (see our Plugin Store for available plugins) and includes a few useful plugins with the Indigo installation.
Installing/Updating Plugins
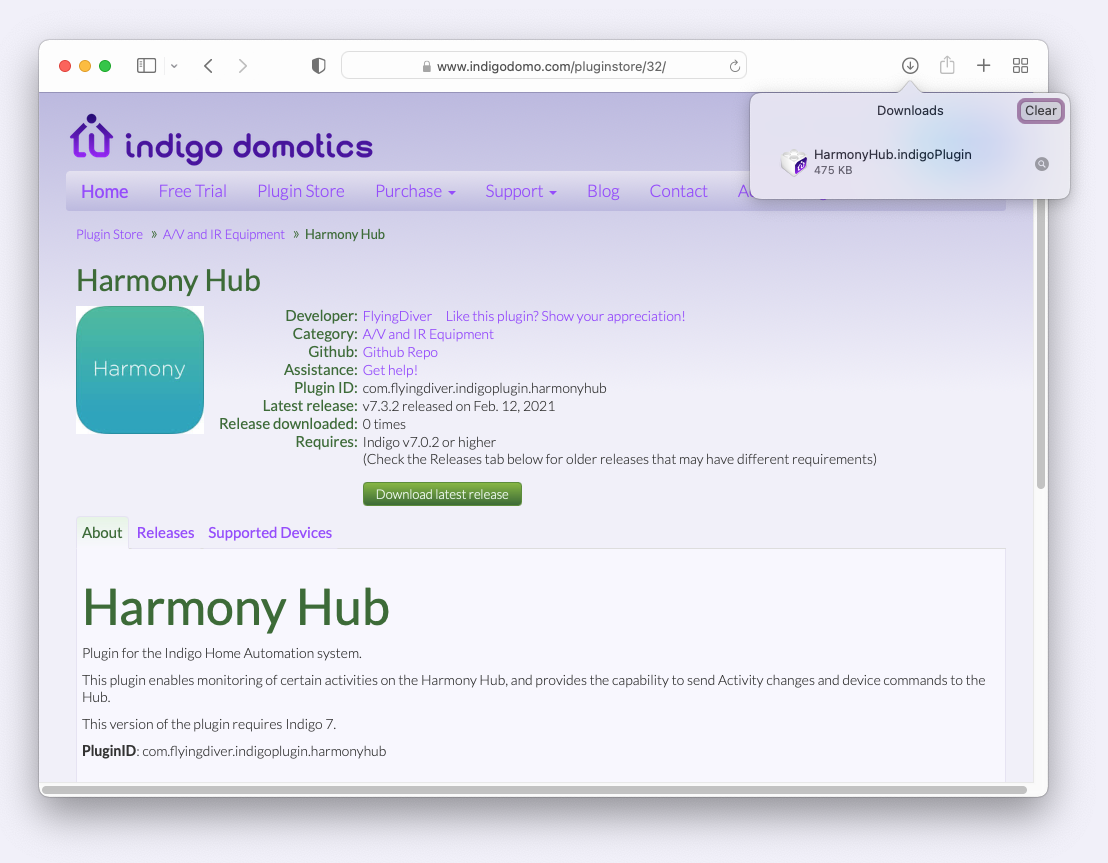
Installing new plugins is pretty simple (updating plugins is the same process, it will just replace the existing one if there is an older version installed). We're going to describe a couple of ways of installing them primarily based on where you get the plugin. While you may get a plugin from anywhere, we recommending getting them from our Plugin Store. To download and install a plugin from the store, this is the process (we're using Safari in these steps, so you may need to adjust accordingly if using another browser):
- In Safari on your Indigo Server Mac, go to the Plugin Store and navigate to the Plugin you want to install.
- Make sure that the plugin is supported by this Indigo release (look for the Requires field). This is an important step because there may be older plugins which aren't compatible with the current version of Indigo.
- Click the
Download Latest Releasebutton, which will download the plugin. If the release isn't compatible with your version of Indigo, you can click on the Releases tab, and look through the list for a version that works with your version of Indigo (click on it and then click theDownload this releaselink). - When the download is complete, click on the down arrow in the title bar which will show the plugin download.
- Most plugins will show the plugin directly as the above image. If it does, double click it and proceed to step 8 below.
- If you see a folder icon (usually with an odd name) in the download dropdown rather than the plugin icon, double-click on the folder and it'll switch to the Finder with the download folder open.
- In the Finder window that's now showing, you should see the plugin which will end in
.indigoPlugin. Double-click that file.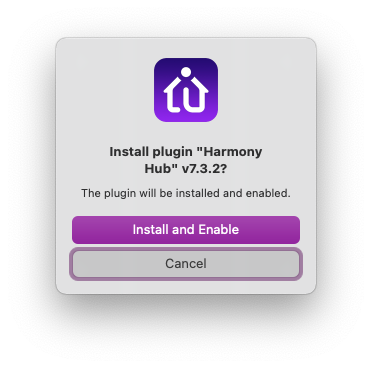
- You will be switched to the Indigo Client app, and you'll a dialog window which asks you if you want to install and enable the plugin. You will see a different dialog if the version number is lower than an already-installed version; for safety, Indigo will ask you to confirm that you want to downgrade the plugin.
- NOTE: due to a bug in some macOS releases, this step may try to launch a previous version of Indigo. If it does, quit it, then right-click the plugin file, select the
Open Withmenu item, then select Indigo 2025.2.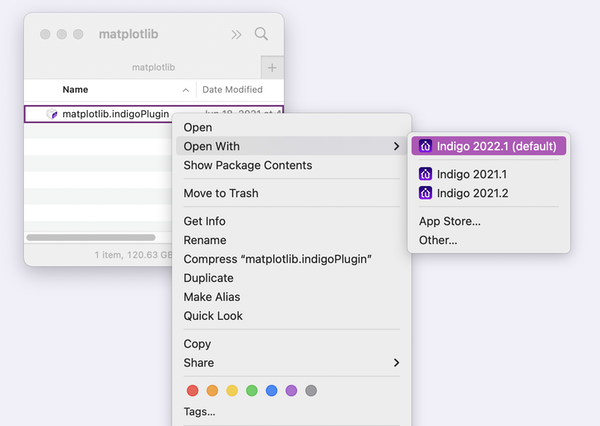
- Click the
Install and Enablebutton. - Done!
Many plugins require some kind of configuration for the plugin itself. If that's the case, then when you click the Install and Enable button, the plugin's configuration dialog may automatically popup:
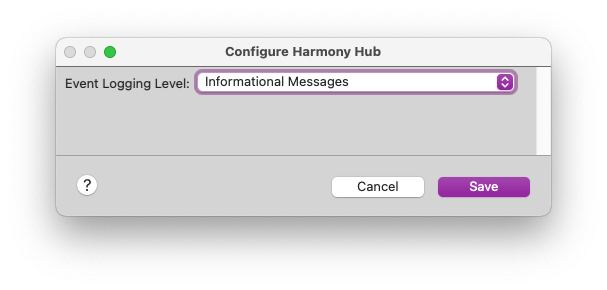
Complete the dialog as necessary (sometimes, as with the example above, you don't have to do anything) and click the Save button. Note: if you click the Cancel button, the plugin may not be fully operational until you completely fill out the dialog and save it.
That's it. As you can see, the experience using the Plugin Store in Safari is straight-forward. However, you may find plugins in other places. When you get a file that ends in .indigoPlugin on your Indigo Server Mac, you can always double-click it in the Finder and then you jump to step 8 above. We encourage all of our 3rd party plugin developers to put their plugins in the Plugin Store so it's easy to find them - you should be cautious about installing plugins that you get from other locations.
Plugin Menus in Indigo
There are a variety of menus in Indigo which will reflect plugin functionality. The first is the main Plugins menu in the Indigo menu bar.
Main Plugins Menu
This is the meta-menu for many things related to plugins.
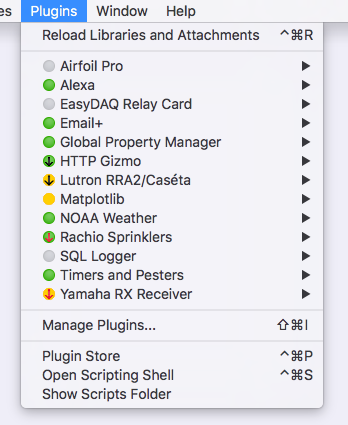
The Reload Libraries and Attachments menu item will allow scripters to add Python libraries to specific locations and use them in Indigo (see Shared Classes and Methods in Python Files for details).
The next section of the menu is dedicated to each plugin that's installed on your system. As you can see, you can tell at a glance the status of the plugin itself:
 a gray dot means the plugin is disabled
 a green dot with no arrows means the plugin is enabled and up to date.
 a green dot with a black arrow means the plugin is enabled and there is an update available that will work with your Indigo version
 a green dot with a red arrow means the plugin is enabled and there is an update available but it won't work with your version of Indigo
There are yellow versions of the dots - the meaning is the same as the green version except it's indicating that the plugin is using an API version that was deprecated with Indigo 2023. You should check the Plugin Store for an updated version or contact the plugin developer.
 a yellow dot with no arrows means the plugin is enabled but needs updating before the next Indigo release
 a yellow dot with a black arrow means the plugin is enabled and there is an update available that will work with your Indigo version - you should install the update before upgrading to the next version of Indigo
 a yellow dot with a red arrow means the plugin is enabled and there is an update available but it won't work with your version of Indigo
There is also a red version of the dot, which can mean several things.
 the plugin is not compatible with your version of Indigo and we are not aware of a version that will work with your version of Indigo.
- the plugin has failed due to a catastrophic error that has caused the plugin to crash or has caused Indigo to stop the plugin. An error will be output to the log to explain the problem.
- the plugin's
self.stopPlugin()method has been called for any reason.
We'll discuss how to change/deal with those states later, but this menu provides a very simple visual dashboard for plugin status.
The Manage Plugins... menu item will open the the Plugins tab of the Indigo Preferences and is discussed below.
The Plugin Store menu item will open the Plugin Store in your default browser, and the Show Scripts Folder will open the Scripts folder (where you can save external scripts in a version-agnostic way).
The Open Scripting Shell menu item will launch the Terminal app and open a window with a Python shell running with all the Indigo API loaded. See the Indigo Scripting Tutorial for more information.
Individual Plugin Submenu
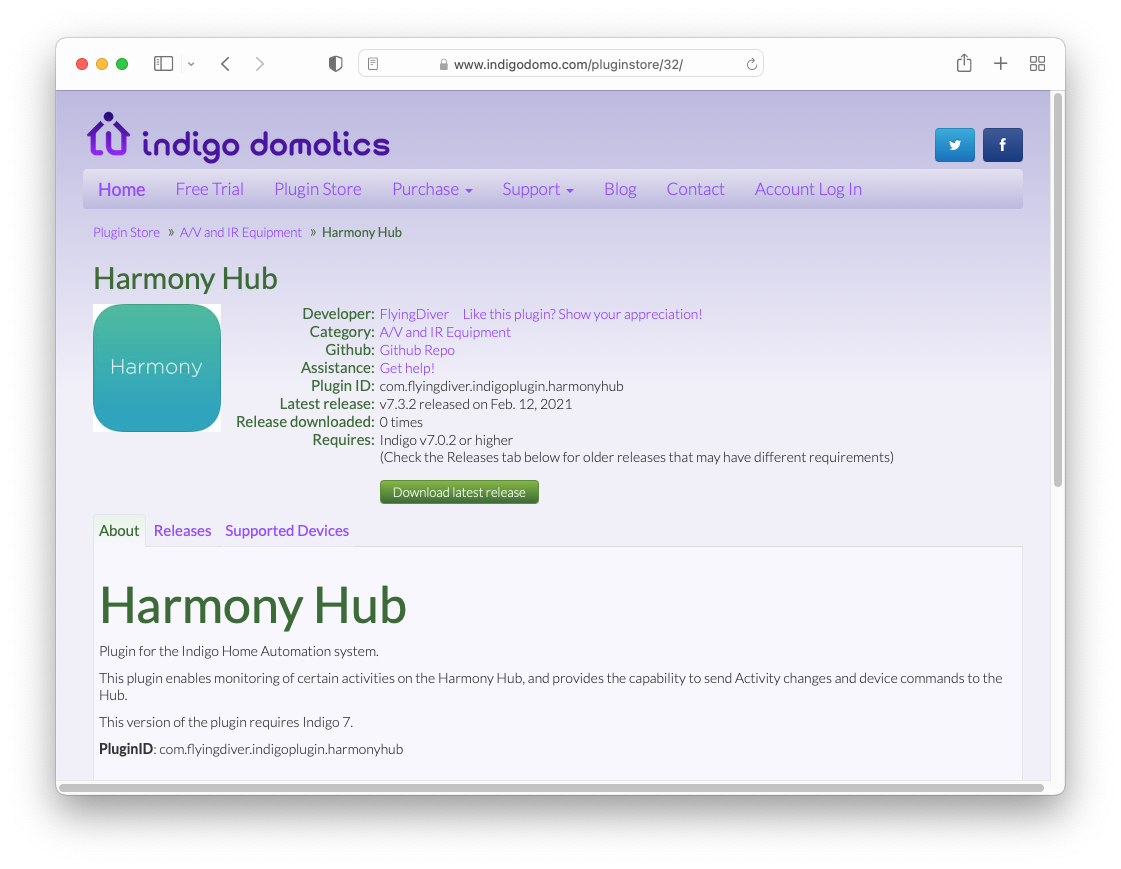
Each plugin installed will have its own submenu on the Plugins menu. For instance, here's the 3rd party Harmony Hub plugin submenu when it's enabled:
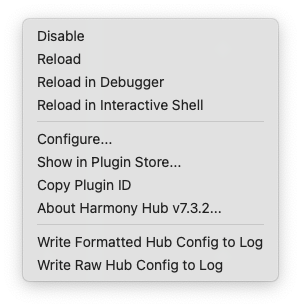
The top section will be available for every plugin
- the first menu item will Enable/Disable a plugin and is a toggle - select `Enable` to enable the plugin and `Disable` to disable the plugin.
- the `Reload` menu item will reload the plugin and will only be present if the plugin is enabled.
- there may be a couple more menus if you have the `Enable debugging menus` item selected in [#the Plugins tab of the Indigo Preferences](#the-plugins-tab-of-the-indigo-preferences) (and are discussed in that section).
The next section contains:
- the `Configure...` menu item will open a config dialog if the plugin has plugin-specific configuration items (if not or if the plugin is disabled, it will not be present).
- the `Show in Plugin Store...` menu item will open the plugin's entry in the Plugin Store in the default browser. If there is an available plugin update that will work on your version of Indigo, the menu title will be `Download New Version...` which will also open the plugin's entry in the Plugin Store in the default browser so you can download the new version, and if there is an incompatible version the menu title will be `Incompatible Version Available...` which will drop a sheet showing what version of Indigo is required to run the new plugin version. This menu item will always show, but if it's grayed out it means the plugin isn't from the [Plugin Store](https://www.indigodomo.com/pluginstore/).
- the `Copy Plugin ID` menu item will always show, and when selected will copy the plugin's unique ID for use in scripts.
- the `About...` menu item will always show the current version of the plugin and will always be enabled.
Any sections below this are specific to the plugin and will contain commands that the plugin presents to the user. If the plugin is disabled, no additional sections will be displayed.
Other Menus with Plugin Items
There are several other places where plugins may insert menu items in the Indigo Mac UI. The first place is in the Device Create/Edit window:
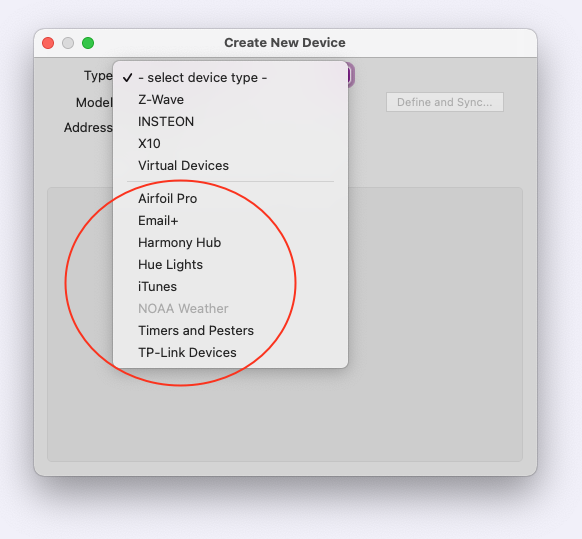
The top half of that menu allows you to create devices from the built-in interfaces. Anything in the bottom half represents plugins that supply new device types that you can create and use in the same way you work with built-in devices (switches, thermostats, etc.). The next place is in the Trigger Create/Edit dialog:
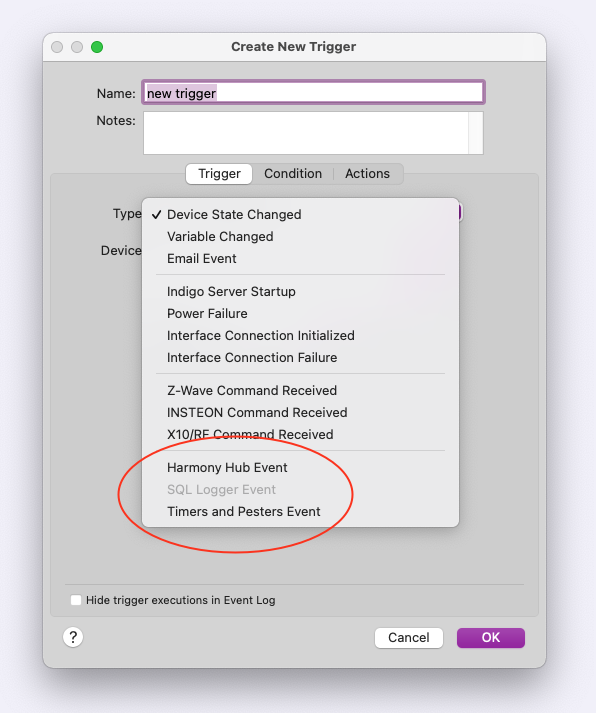
The last section of that menu will show plugins that supply custom events that you can trigger from. The final place that plugins can add menu items is in the Action Create/Edit window:
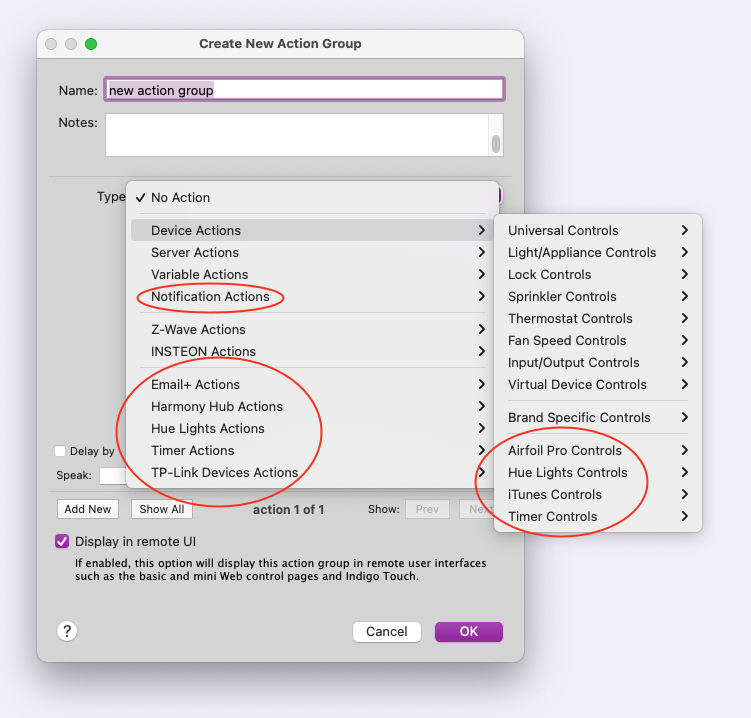
There are actually 3 places where plugins can add menu items to the actions windows: The first is at the bottom of the Device Actions submenu: menus here are for plugin actions that act on devices. The second place is on the Notification Action submenu: plugins that supply some kind of notification action will put their actions on this submenu. Finally, at the bottom of the Action Type menu itself: this is where plugins will add actions that don't fit into the other two categories.
As you can see, plugin integration in Indigo is quite extensive.
The Plugins tab of the Indigo Preferences
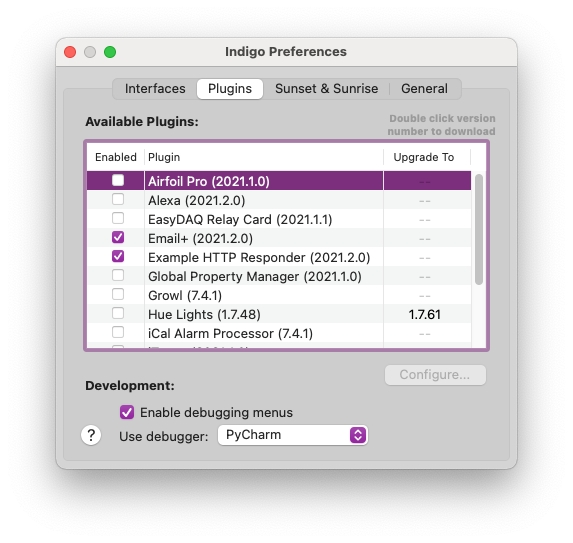
You can also enable/disable a plugin and download a new plugin version from the Plugins tab in the Indigo Preferences. You open the config window choosing the Indigo 2025.2->Preferences... menu item and clicking the Plugins tab or by selecting the Plugins->Manage Plugins... menu item discussed above.
You can enable/disable the plugin from this list (by checking the Enabled checkbox) and you can double-click on the plugin's name (or select it and click the Configure... button) to open the configuration dialog for the plugin (if there is one and the plugin is enabled). Again, if this is the first time the plugin has been enabled this will open the configuration dialog for the individual plugin if the plugin supports a one.
You can also see the current version of the plugin and the version of the most recent release if there is a newer version. If the newer version is not compatible with your version of Indigo, it will show up in red. Double click the new version number open the Plugin Store entry for that plugin in your default browser where you can download the new version and install (see Installing Plugins above for the process).
At the bottom of this tab, you'll notice a section labeled Development. There are 2 options here to help plugin developers with the various tasks needed to develop and test plugins:
- the
Enable debugging menuscheckbox will add two new menus to the plugin's menus:Reload in Debuggerwill reload the plugin and connect to the selected debugger;Reload in Interactive Shellwill open a terminal window with a Python shell that's connected to the plugin so the developer can run commands and inspect arbitrary objects in the running plugin. - the
Use debuggerpopup is used to tell Indigo which debugger to start the plugin up when you use the above menu items.
See the Python Debugger Support forum post for further details on how to use these features to aid in developing a plugin.
Uninstalling a Plugin
If you would like to permanently remove/uninstall a plugin (rather than just disabling it by unchecking the Enabled button or using the menu item for the plugin), you may do so by following these steps:
- In the Indigo app, select the
Help->Show Indigo Server Install Foldermenu item. This will switch you to the Finder and open a window to the Indigo install folder. - Switch back to Indigo and shut down the Indigo Server by selecting the
Indigo 2025.2->Stop Servermenu item in the Mac client (you can leave the client app running). - In the Finder window opened in step 1, you'll see two folders:
PluginsandPlugins (Disabled). Depending on whether the plugin is enabled or not will determine which folder it's in. Open the appropriate folder and delete the unwanted plugin. Check to make sure that somehow there aren't plugins in both locations. - Switch back to the Indigo 2025.2 Mac client and click on the
Start Local Server...button in theServer Connection Statusdialog.
The plugin will no longer show in the Plugins tab or in the Plugins menu.
Modify Energy Saver Settings to Prevent Computer Sleep
- Choose
System Preferencesfrom theApplemenu. - Select the
Energy Savericon. - Move the
Computer sleep:slider toNever. - Uncheck
Put the hard disk(s) to sleep when possible. - Select the
Start up automatically after a power failurecheckbox.
Python Script Changes and Plugin Compatibility
All Indigo embedded and external Python scripts run in Python 3. If any of them aren't working, they may have been written for an older version of Python. Take a look at our updating to Python 3 tips document. You can also post your scripts on the Help Converting to Python 3 forum to get help with any conversion issues.
Reset Your Reflector's Activation
If you are switching to a different reflector that you've asked us to create for you, or you've been instructed by support to reset your current reflector's activation, then follow these steps:
- Shut down the Indigo Server (select
Indigo 2025.2->Stop Server) but don't quit the Indigo Client - Switch to your browser and log out of your Indigo Account
- Go to the reflector list in your Indigo Account (you'll need to log back in) and click the
Resetlink beside your reflector's status (it should say Activated before your press Reset) - Switch back to the Indigo Client and click on the
Start Local Serverbutton
You should now see an Activate Reflector button towards the bottom of the dialog. Click that, log in to your reflector account, and select the appropriate reflector. If the reflector you want to use doesn't show in the list of inactive reflectors, contact us with the name of the reflector you're trying to activate and what steps you've performed.
Manual Reset
If the procedure above doesn't work, and only if instructed by support, follow these steps to manually reset your Indigo Client reflector settings:
- Shut down the Indigo Server (select
Indigo 2025.2->Stop Server) but don't quit the Indigo Client - Switch to your browser and log out of your Indigo Account
- Go to the reflector list in your Indigo Account (you'll need to log back in) and click the
Resetlink beside your reflector's status (it should say Activated before your press Reset). If the reflector has already been deactivated that is fine – just skip this step. - In the Finder, select
Go->Go to Folder… - In the resulting dialog, copy and paste the following:
/Library/Application Support/Perceptive Automation/Indigo 2025.2/Preferences/ - In the resulting Finder window, delete the folder named
PrismReflector - Switch back to the Indigo Client and click on the
Start Local Serverbutton
Indigo Touch and Your Reflector
Indigo Touch for iOS is transparently integrated with the Indigo Reflector service. When you use your iOS device (iPhone, iPad, etc.) to connect to Indigo while in your house (and on your local Wi-Fi network), Indigo Touch will automatically retrieve and remember your reflector address. You can press the settings (gear) icon on the top toolbar then find the Reflector item near the bottom to verify that it is working correctly.
Once Indigo automatically detects your reflector address, it will seamlessly change between using the local Bonjour detected address and the remote reflector address. Just launch Indigo Touch and it works, no matter where you are!
Modifying Firewall Settings
If you are using the macOS built-in Firewall, and depending on how you have your firewall configured, you may be prompted by the firewall with the following dialogs the first time you start Indigo:
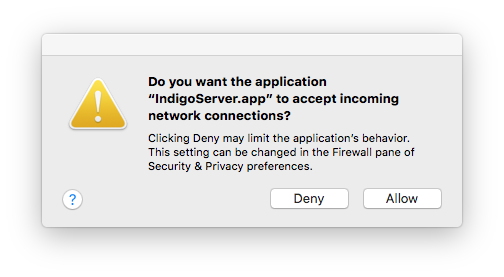
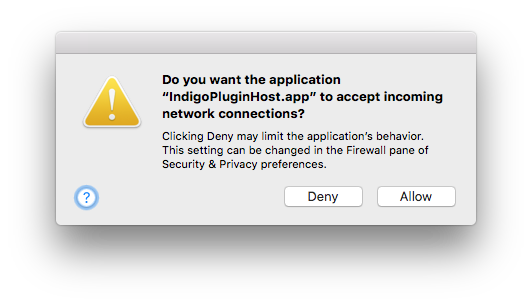
You must click the Allow button in those dialogs (if they pop up) or Indigo will not function correctly.
Discovering the Indigo Server IP Address (LAN only)
The Indigo Web Server advertises itself via Bonjour, so Indigo Touch and Safari (by clicking on the bookmarks icon, then selecting Bonjour) will automatically find any local servers. In addition to that, when connecting to a local server for the first time, Indigo Touch will also automatically fetch Reflector settings for that connection so that you'll be able to connect outside your LAN via LTE/4G/3G/Edge.
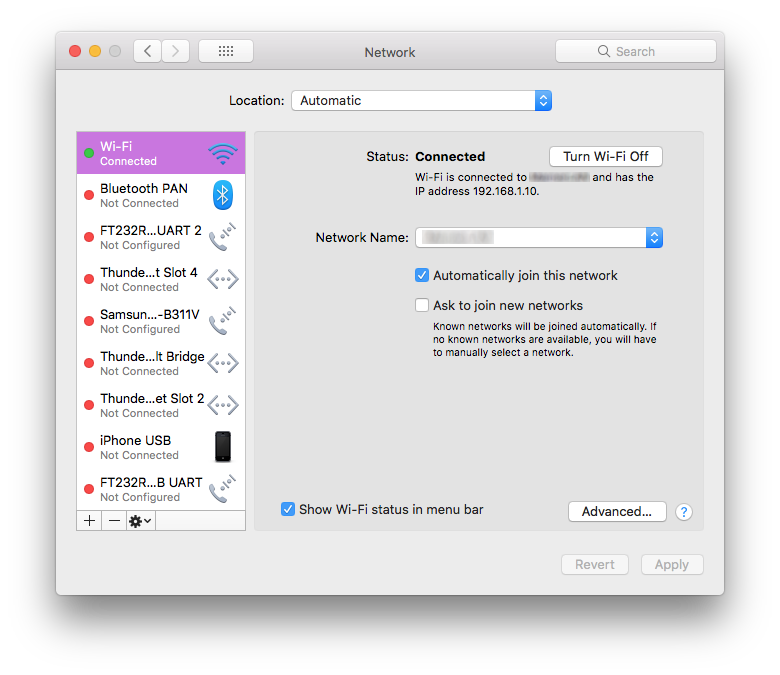
For other browsers to remotely access the Web server, we need to know the network IP address for the Mac running Indigo Server. This address will be used on the remote Mac or Web browser when connecting to the Indigo Server. By selecting the active network in the Network System Preference, you can see the IP address for your Indigo Server Mac. For WiFi, it might look something like this:
and a wired Ethernet connection might look something like this:
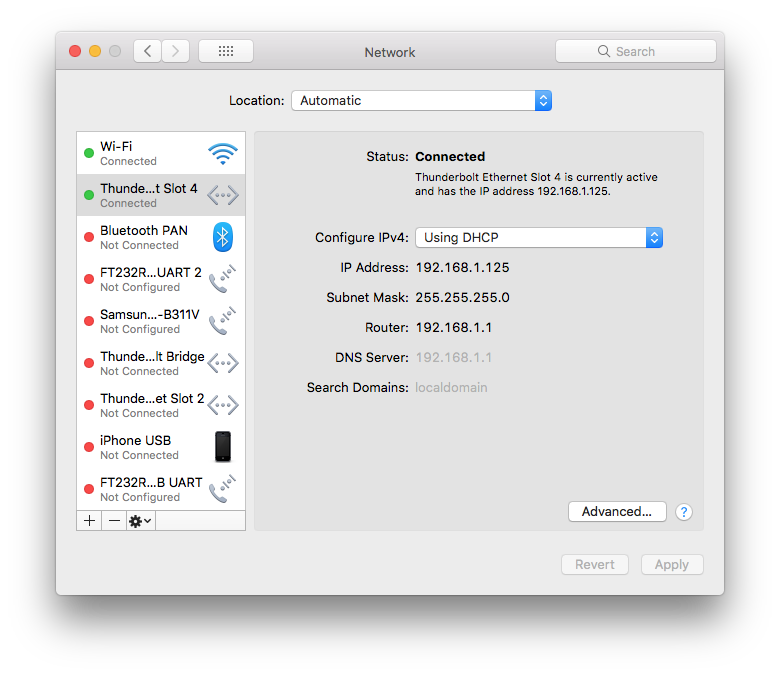
Note the IP address under the Status section.
You now have the IP address for the Mac running Indigo Server. Depending on your home network setup, this IP address may change periodically, such as when the Indigo Server Mac or router is restarted. If this happens, then you can use the steps above to discover the IP address again, or you can configure a static (not dynamic) IP address for the Mac running Indigo Server (that is an exercise left to you as it would be totally dependent on your network configuration).
Remote Access Using the Indigo Client
- If you haven't already installed the client on the remote Mac, run the Indigo Installer on the remote Mac and on the Installation Type step click the Customize button. Unselect everything except the Indigo Client line and click Install.
- Double click the
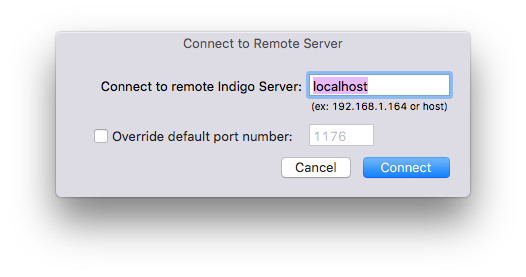
Indigo 2025.2application (inside/Applications/Indigo 2025.2.app) on the remote Mac. - If this is the first time to run Indigo on this remote Mac, then press the
Connect to Remote Server...button in the connection status window. - If you are wanting to connect to a different Indigo Server, then select the
Indigo 2025.2->Connect to Remote Server...menu item. - Enter the
IP addressfor the Indigo Server Mac discovered in the section above. - If you overrode the Indigo Server port number (default:
1176) in the Start Local Server dialog on the server Mac, then select theOverride default port numbercheckbox and enter your custom port number. - Press the
Connectbutton.
Indigo Mac Client and the Indigo Reflector
The Indigo Mac Client doesn't use the Indigo Reflector service. Connecting an Indigo Mac Client to a server over the internet is a complex topic that is well beyond this document – we suggest you search our online forums for others that have configured this type of access.
Remote Access Using Indigo Touch
Indigo Touch, the iPhone and iPod Touch application from Indigo Domotics, allows the user to view and control Devices, activate Action Groups, view Variables, and access custom Control Pages. One of the best features of Indigo Touch is its ability to automatically detect and configure network connections. If your iPhone (or iPod Touch) is connected to your local wireless LAN, then it should automatically discover your server. In Indigo Touch, tap the Settings button. You should see the name of your Database in the list. Tap on it, and it will connect (it will ask for your username/password if you have one set, but it will remember it going forward so you won't have to type it in again).
At this point, Indigo Touch will also query the server to see if you have an Indigo Reflector set up for the server. This makes connecting to your home server via Indigo Touch completely seamless. If you have a reflector set up and running, then Indigo Touch will automatically attempt to connect no matter where you are or how you're connected. If you're local, it will use the local WiFi network, if you're on a remote WiFi network, it will attempt to use the reflector account. If you're iPhone is on LTE/4G/3G/Edge, it will also attempt to connect via your reflector account. This makes Indigo Touch truly location agnostic!
You can, however, configure a connection manually. Simply tap Manually Add Server on the Settings screen in Indigo Touch and you can enter your host/ip address and port number.
Remote Access Using a Web Browser
Indigo, when run in client/server mode, will automatically start its built-in Web server on launch. This allows access from remote Macs, PCs, and other internet devices like the iOS devices, Android devices, etc. Any device that can run a modern Web browser (Safari, Chrome, Firefox) will work.
To access the Indigo Web Server use the IP address you discovered in the section above along with the Indigo Web Server port number (default: 8176). The URL will look like this (substitute your server's correct IP address):
http://192.168.1.23:8176/
See the using Control Pages section for information on how to create custom browser accessible interface pages.
Where to Go Next
Congratulations! You should now have a basic functioning Indigo installation that's ready for you to start adding devices and defining your home automation logic. We suggest that you next go to the Overview of Devices, Triggers, Schedules, Action Groups, Control Pages, and Variables - that will give you the information you need to begin using the features of Indigo.
Z-Wave® is a registered trademark of Sigma Designs, Inc. Indigo's support of Z-Wave hardware is neither endorsed nor certified by Sigma Designs.