Virtual Devices Interface
In this guide
How to enable and use Indigo's Virtual Devices Interface to create non-physical device types — Device Groups, Aggregate and Average Sensors, Virtual Dimmers, and more — that track or aggregate the states of real hardware devices. Covers enabling the interface and configuring each device type.
Indigo provides a Virtual Devices Interface type that provides users with several new device types, each discussed below. If you want to use Virtual Devices, make sure to enable them by selecting the Interfaces->Virtual Devices->Enable menu item.
To add a virtual device to Indigo, follow these steps:
- Select
DEVICESin the Main Window outline view or select one of the sub-folders. - Click the
New...button. You'll see theCreate New Devicedialog. - Select
Virtual Devicesfrom the Type popup menu. - Select the model of virtual device you want to create (described below).
Device Groups
With the addition of Z-Wave (and various plugins that define dimmer and relay devices) it has become apparent that we need to provide some way to create technology-agnostic groups of devices. You can, of course, control groups of devices through Action Groups, and for most cases that's good enough.
However, there are some cases where you want a group to track the state of the devices it contains. So not only do you want to turn on/off a group, you want to know when any of the devices in the group "leave" the definition of the group by changing. So we've created a new "Device Group" device to help you with that.
We've also added a twist to this device. When we create the device (and anytime later), we save off the current state of each device in the group. It's like taking a snapshot of each device. When you turn ON the group, we'll use the value that the device was when you last saved the device states. We think you'll really love this feature since you can set all the devices how you want them, then save the device states.
To create a device group, you just create a new device, select Virtual Devices from the Type menu, select Device Group from the model menu, and you'll see the configuration dialog:
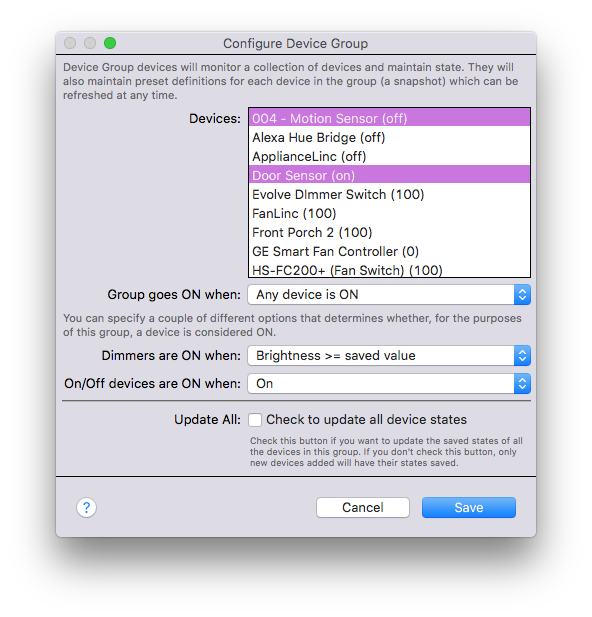
Select the devices you want to be in the group (only dimmer devices, relay (on/off) devices, and sensor devices that support an on/off state are available). To select multiple, hold down the command key and click the device in the list. Notice that the devices all have something in parentheses after the name - that's the current value of the device that will be saved. If it's a dimmer device, it shows the brightness and if it's a relay (On/Off) device, it shows whether it's on or off. When you save, that's the value that will be saved. These values will be used when the group is turned on.
Next, you specify how the plugin will manage the ON state of the device group. The two choices are:
- All devices are ON - the group state will be set to ON when all devices in the group are ON
- Any device is ON - the group state will be set to ON when any of the devices in the group are ON
Finally, you need to specify how Indigo will determine if a device is ON or OFF. For dimmer devices, you have the following options:
- Brightness >= saved value - by selecting this option, the device will be considered ON when the brightness is greater than or equal to the value of the brightness saved for that device. Note that you can have a brightness set to 0 when the group was saved, in which case when the group is turned on the brightness will be set to 0.
- Brightness > 0 (On) - by selecting this option, the device will be considered ON when the brightness is greater than 0. So it will be considered on even at very dim settings.
For relay (on/off) and sensor devices, you have the following options:
- Equal to saved value - by selecting this option, the device will be considered ON when it is equal to how it was set when you saved the state for that device. This way, you can add a device when it's off and turning on the group will in fact turn off the device.
- On - this is the most obvious option - if the device is really ON, then it's considered ON.
To use a device group, just use the standard Control Light/Appliance action to turn it ON/OFF, and create triggers on the group's ON and OFF state via the Device State Changed trigger type. Turning a device group on will set all the devices to their respective saved state. You can also update the states of the devices in the group at any time by using the Update Device Group States action or menu item. That's it!
Sprinkler Group
We've regularly heard that users have multiple sprinkler controllers and would like to treat them as a single controller. This Virtual Device does just that. You can specify up to 4 different physical sprinkler devices:
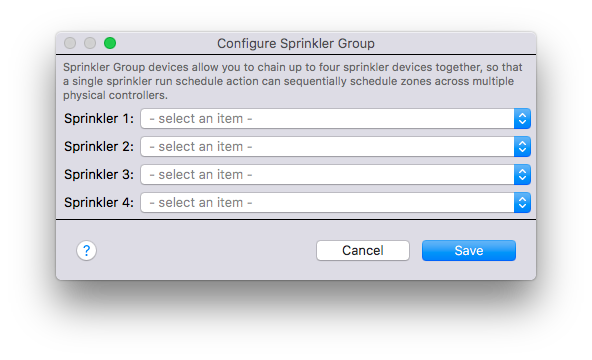
Indigo will treat the resulting group as a single sprinkler. You can create standard sprinkler schedules for it and never have to worry that there might be multiple sprinkler controllers running at the same time.
Virtual On/Off Devices
One of the things that we often see are people who want to create a device that can be turned ON and OFF, but don't have the knowledge or expertise to build a full-on plugin. And sometimes a full plugin would be overkill, particularly if the device is so custom that it really wouldn't be useful to anyone else.
That's where the Virtual ON/OFF Device comes in. This device type will allow users create custom devices without the need to build an entire plugin. In fact, the first iteration of this device doesn't even require any programming at all! Virtual devices can be shown in the Indigo UI, the Indigo Web UI, and the Indigo Touch UI as on/off style devices and can be controlled using the normal on/off UI controls.
To create a virtual device, you just create a new device, select Device Collection from the Type menu, select Virtual On/Off Device from the model menu, and you'll see the configuration dialog:
Execution Models
We intend to support several different ways that users can have virtual devices accomplish their tasks:
- Action Groups - where the functions are carried out by Action Groups (with a little assist from Variables if you want)
We've only implemented Action Groups, but in future releases we may add other execution models.
Action Groups
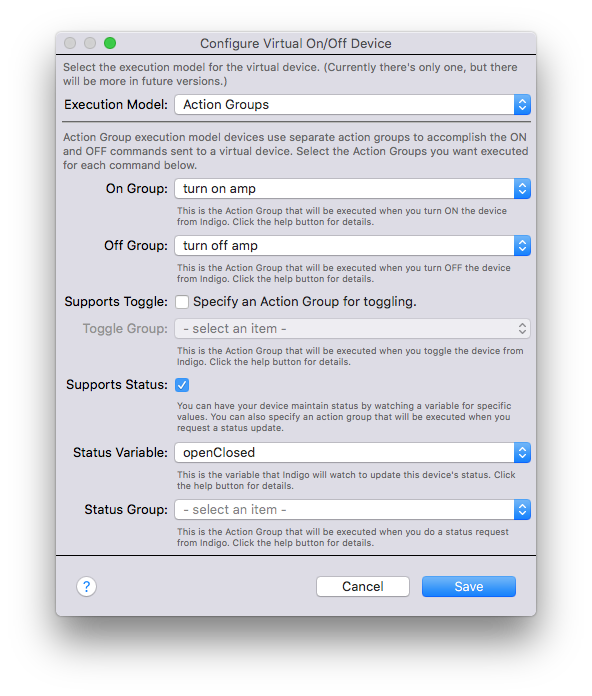
In order to make virtual devices simple enough for non-technical users to use them, we started with the Action Groups execution model. This means that you specify an action group to execute for each of the major tasks that a ON/OFF Device can perform: turn on, turn off, toggle, and get status. Here's the config dialog for Action Groups:
The first thing you'll select are the action groups to execute when the device is turned on and off. So if you click the Turn On button or select the Turn Off action in the Control Light/Appliance action, for example, the appropriate action group will be executed. These two are the minimum requirements for this type of virtual device.
Next, you can specify an action group that will toggle a device - so if there's some way for your action group to determine at runtime how a toggle should work then you can specify it. If not, just leave the checkbox unchecked.
Automatic State Maintenance
Finally, your virtual device can maintain a state if you like. But, Action Groups can't directly manipulate state you say, right? Well, that's true. However, Action Groups can modify a variable. So, we've allowed you to select a variable and we'll monitor that variable for any change. If the value of the variable becomes "on" (or "true", "open", "1", "yes", "enabled"), we set the state of the virtual device to on. If the variable becomes "off" (or "false", "closed", "0", "no", "disabled"), then we set the state to off.
If you set the value of the variable to anything else, we'll set the state of the device to whatever you entered for the variable value AND we'll mark it as having an error. This will cause the device to turn red in the device list to help show you that there's a problem. (Z-Wave devices will do this as well and eventually Insteon devices will too).
So your device's state will mirror the value in the variable. You can also specify an action group that will be called when you request a status update via the UI or via an action.
Note: if you don't enable Supports Status, your virtual device will always show as being "off" in the UI and triggers that watch for state change will never fire. That may be fine for your particular needs so we made it optional.
Scripting State Maintenance
You can also set the on state of a virtual device:
virtual_devices_interface = indigo.server.getPlugin("com.perceptiveautomation.indigoplugin.devicecollection")
if virtual_devices_interface.isEnabled():
    virtual_devices_interface.executeAction('setVirtualDeviceState', deviceId=DEVICEIDHERE, props={'newValue': 'on'})
Use on or off to set the state, anything else will be interpreted as an error and will show accordingly in the UI.
So that's it - you can implement a very simple On/Off virtual device just by specifying a few action groups.
Virtual Sensors
Virtual Sensors are plugin devices that are linked to external Python scripts that send instructions to the Virtual Device so it can be used to track a desired status. The device also sends information back to the external script for further processing if needed.
Say you want to use an external script to send a value to the Virtual Device based on some logic in your script and then fire an Indigo Trigger based on the result. You would create a Virtual Sensor, link it to your external script, and set up an update Action to tell the Virtual Sensor to request a status update from your script.

Supported States
Virtual Devices support two states and must support at least one of the following:
- On State - your device will have an on/off state.
- Sensor Value - your device will have a sensor value.
Script Locations
You can add scripts directly to the /Library/Application Support/Perceptive Automation/Python3-includes folder, or you can point to a script in any location that Indigo has the authority to access. Python scripts that are saved to the above folder will be available in the Script File dropdown menu. Alternatively, you can check the Custom Location checkbox and a field will open for you to enter the full path to the script file.
Controlling Scripts
You control the state of Virtual Sensor Devices with Python scripts (the device executes the controlling scripts directly). The controlling script must have a virtual_sensor_status() method which the Virtual Sensor Device will call, and must return a valid dictionary with the following possible keys (types shown in brackets):
# If you want to pass something to the Indigo Event Log, you will need to import the
# logging module and access the parent plugin's logging instance.
import logging
logger = logging.getLogger("Plugin")

def virtual_sensor_status(device: indigo.Device, action_props: dict) -> dict:
    """
    This is the only method that the virtual sensor will call, unless you make calls to
    other parts of your script from here.

    :device: a copy of the virtual sensor device object [indigo.Device]
    :action_props: any action object properties provided [dict]
    :returns: updated sensor values [dict]
    """
    payload = dict()
    payload['onState'] = True  # must be a bool [True/False]
    payload['onStateUiValue'] = "Closed" # Can essentially be any valid string [string]
    payload['sensorValue'] = 32  # note that Indigo always stores this as a float [int or float]
    payload['sensorValueUiValue'] = "32º"  # the value in Indigo's UI. [string]
    payload['icon'] = "indigo.kStateImageSel.TemperatureSensor"  # i.e., [indigo.kStateImageSel]

    logger.info("Linked script executed.")
    return payload
*device* -- in this context, the *device* parameter will contain a copy of the Virtual Sensor device that is linked to the script.
*action_props* -- in this context, the *action_props* parameter will contain any props passed from the Indigo Action that caused the Virtual Sensor device to update. If the device was updated by a Send Status Request or a "generic" Indigo Action refresh call, action_props will be an empty dictionary.
The Virtual Sensor will adjust its states based on the values returned from the virtual_sensor_status method. When that method is executed, you can make calls to other parts of your script in order to determine what the payload values should be. If the update is completed successfully, the Virtual Sensor will provide a copy of the device object and an action_props dict when it requests an update from your script.
Triggers and Actions
Virtual Devices will respond to an Indigo Action call. When the Update Virtual Sensor Action is called, the Virtual Device will reach out to your script and update its states accordingly. You can also refresh the Virtual Sensor device by making a call to Indigo's API.
The *indigo.actionGroup.execute* API command message doesn't include action props, so the *action_props* property above will be an empty dict. You can execute this command message from both the Websocket and HTTP APIs.
{
  "id": "optional-custom-user-message",
  "message": "indigo.actionGroup.execute",
  "objectId": 123456789
}
The *plugin.executeAction* API command message can include optional props, and is currently only available in the HTTP API command space.
{
    "id": some-optional-message-ID,
    "message": "plugin.executeAction",
    "pluginId": "com.some.indigo.plugin",   # the plugin's bundle identifier
    "actionId": "some_plugin_action",  # the ID of the plugin action found in the plugin's Actions.xml file
    "deviceId": 12345678,  # the device ID targeted by the plugin action (not all actions will require a device ID).
    "props": {"prop1": "foo", "prop2": "bar"},
    "waitUntilDone": True
}