Indigo Web Server
In this guide
How to configure and use the Indigo Web Server (IWS) to serve custom content locally or via the Indigo Reflector. Covers authentication methods, port settings, the Web Assets folder structure, plugin resource folders, and integration examples using Node-RED and JavaScript frameworks.
The Indigo Server contains a fully-functioning web server that you can use to serve content locally or via the Indigo Reflector Service (the Reflector requires an active Indigo Up To Date subscription). You can use this functionality to make content available in a variety of ways. For example, Indigo users have created complex websites using JavaScript, Vue, and Svelte. See below for a fully-functional example.
Security Certificates
Displaying web content in a secure format using HTTPS requires a security certificate for the site your browser is connected to. These certificates are typically reviewed and signed by a third party authority to ensure they're legitimate. Indigo's certificate is “self-signed”, which means that it hasn't been reviewed by a third party. We must use a self-signed certificate because it isn't possible to have an authority-signed certificate for a local server name (localhost or 127.0.0.1) that doesn't have its own domain name.
Appropriately, your browser will warn you that a security certificate is self-signed and require you to intervene in order to display the requested content. You can choose to respond to this warning each time it appears, or you can tell your browser to trust the certificate – which will typically silence these warnings. We have a separate page that describes various ways to handle self-signed certificates.
Advanced Web Server Settings
Select the Indigo 2025.2->Advanced Web Server Settings... menu item and you'll get this dialog:
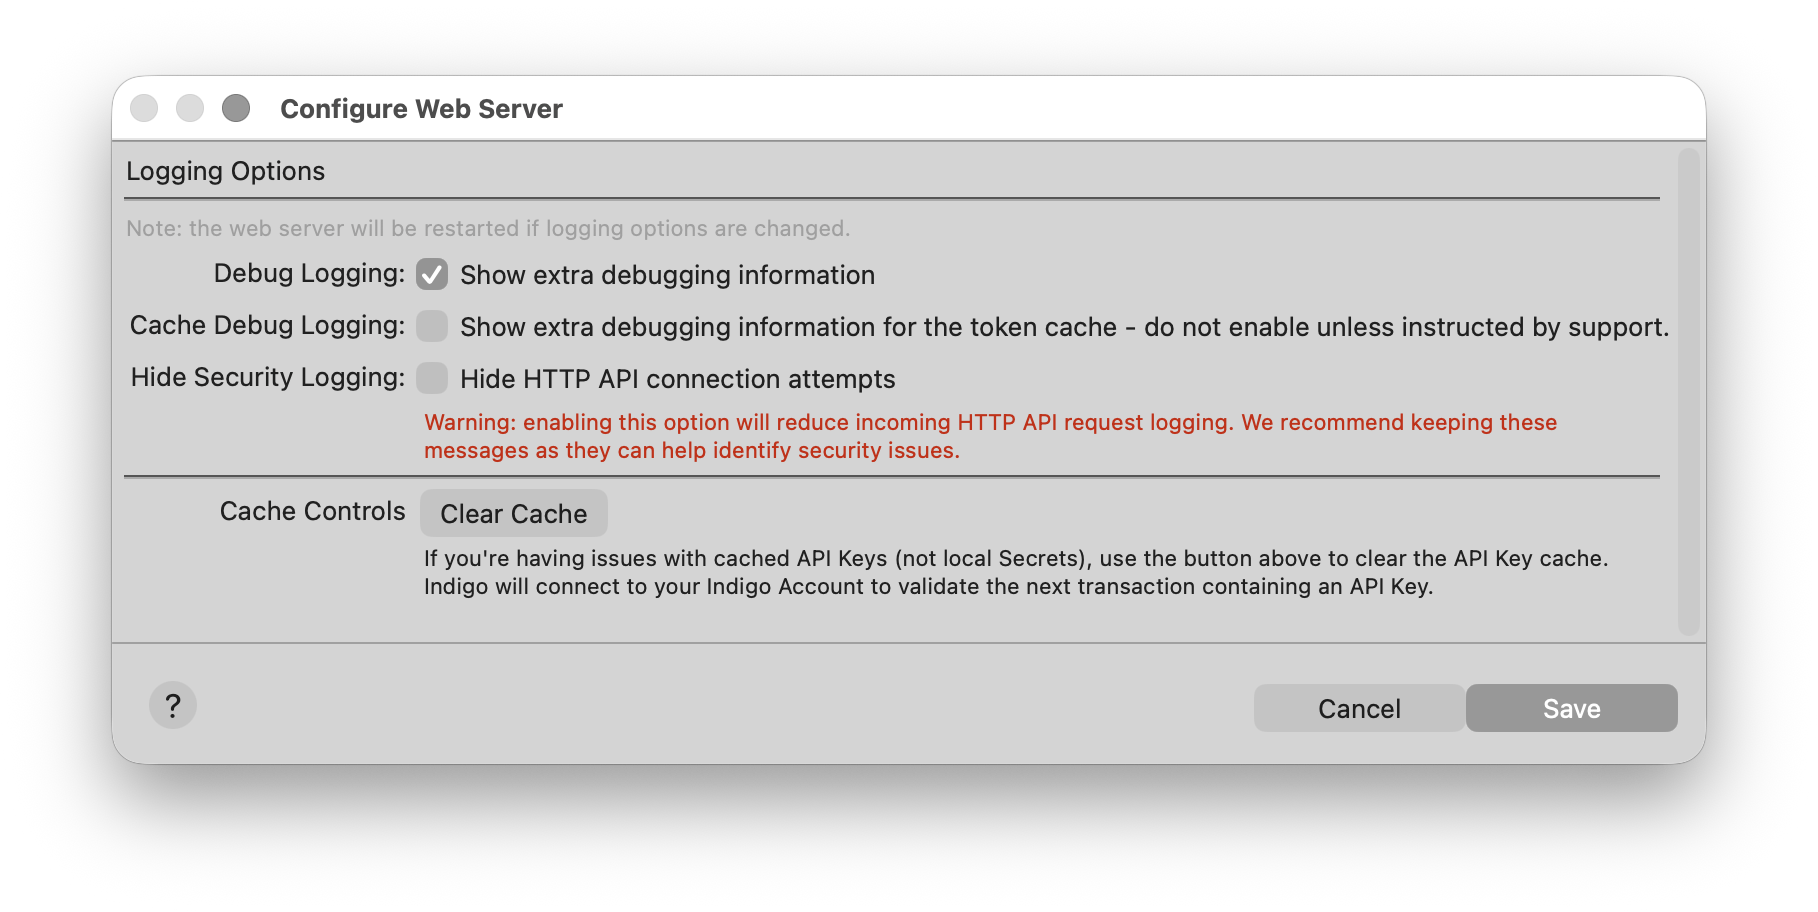
The menu has three options:
- Debug Logging: Enable this setting to show extra Web Server debugging information.
- Hide Security Logging: Enable this setting to hide HTTP API connection attempts. Warning: enabling this will reduce the logging of incoming HTTP API requests. We recommend keeping these messages as they can help identify security issues.
- Cache Controls: If you are having issues with cached API Keys (not Local Secrets), use the button to clear the key cache. This will force Indigo to connect to your Indigo Account to validate the next transaction which contains an API Key.
Web Assets Folder Structure
Indigo 2025.2 contains special folders that are accessible to the Indigo Web Server which are located in:
There are four stock folders located under this parent folder:/Library/Application Support/Perceptive Automation/Indigo 2025.2/Web Assets/images
/Library/Application Support/Perceptive Automation/Indigo 2025.2/Web Assets/plugins
/Library/Application Support/Perceptive Automation/Indigo 2025.2/Web Assets/public
/Library/Application Support/Perceptive Automation/Indigo 2025.2/Web Assets/static
As a convenience, you can access these folders under the Indigo Help menu: Help --> Show Web Assets Folder
All assets you want to make available to the Indigo Web Server should be stored in these folders.
images folder
This folder is used to publish files and make them available in the Indigo UI for use in control pages (and for other purposes). More information on using this folder can be found in the Custom Images on Control Pages page.
plugins folder
With Indigo 2022.2, web server plugins are no longer supported.
public folder
This directory can be used to publish files from the Indigo Web Server that will be made available to anyone *without any authentication*. If someone knows the URL of your reflector, they will have access to any files that are in this directory, so use it wisely.
For example:
https://MYREFLECTOR.indigodomo.net/public/about.txt
http://10.0.1.2:8176/public/about.txt
http://localhost:8176/public/about.txt
Basic MIME types will be determined from file extensions. Subdirectories are also allowed so you can create hierarchy:
https://MYREFLECTOR.indigodomo.net/public/somedirectory/somefile.html
https://MYREFLECTOR.indigodomo.net/public/images/somepic.jpg
Any files and/or directories in the /public/ folder will need to be moved over when you upgrade to a new major version (the installer WILL NOT move them automatically). The public folder was added with Indigo version 7.1.
static folder
This directory can be used to publish files from the Indigo Web Server that will be made available to anyone *with authentication*. If someone knows the URL of your reflector, they will have access to any files that are in this directory once they have entered the appropriate authentication credentials for your reflector.
For example:
https://MYREFLECTOR.indigodomo.net/static/about.txt
http://10.0.1.2:8176/static/about.txt
http://localhost:8176/static/about.txt
Basic MIME types will be determined from file extensions. Subdirectories are also allowed so you can create hierarchy:
https://MYREFLECTOR.indigodomo.net/static/somedirectory/somefile.html
https://MYREFLECTOR.indigodomo.net/static/images/somepic.jpg
Authentication
API Keys
Information on Indigo Authentication options using API Keys can be found on the Integration APIs page under the authentication section.
Local Secrets
In addition to authentication via API Keys and the Indigo Reflector (recommended), users can create their own local secrets (another type of key) that don't require an internet connection to validate. Users can create a JSON list of their own "secrets" that will be loaded whenever the web server is restarted. The secrets file is located in the install folder's /Preferences directory and is named //secrets.json//:
/Library/Application Support/Perceptive Automation/Indigo 2025.2/Preferences/secrets.json
Those secrets can be used in both authorization headers and in the api-key query argument on URLs (exactly the same as API Keys). Example:
Additionally, if the user wants to completely disable API Keys, they may add the string "do-not-use-api-keys" to their list of secrets.
The effect here is that only the first two will successfully authenticate API calls and nothing else. If the user only specifies this:
The effect would be the same as unchecking the "Enable OAuth and API Key authentication" checkbox in the Start Local Server dialog, but with different logging when an authentication try fails. While valid, this configuration is not recommended; instead, users should use the OAuth setting when the server is first started (to avoid confusion).
You use the local secret(s) the same way you would use an API Key; for example,
*http:*localhost:8176/v2/api/indigo.devices/123456789?api-key=my-local-secret//
Important! - When making changes to the secrets.json file, you must restart the server for the changes to take effect (the server loads the secrets file at startup).
Custom Web Page Example
Using the Indigo Web Server and Web Assets folders is extremely easy. This example is for reference purposes and is not meant to be a primer on constructing Web content. There are many good tutorials online that you can refer to if needed.
First, create your content. For example, websites often contain a index.html page. A simple index.html page looks like this:
<!DOCTYPE html>
<html lang="en">
  <head>
    <meta charset="utf-8">
    <title>Indigo Web Server</title>
  </head>
  <body style="height:100%; width:100%">
    <div id="content" style="position:absolute; top:0px; left:0px; height:200px; right:0px;overflow:hidden;">
      Hello world.
    </div>
  </body>
</html>
index.html within the .../Web Assets/static folder (to serve it with authentication) or within the .../Web Assets/public folder (to serve it without authentication). You can refer to assets located in other folders by referencing them with the Web Assets folder as the root.
That's it! The Indigo Web Server will serve your web page via the appropriate method.
Troubleshooting
The Indigo Web Server is a complex piece of the Indigo ecosystem, but it rarely has issues. There are some things that have happened in the past, and we thought we'd outline some debugging steps here.
Websocket Failures
In rare circumstances, problems may arise that cause an inability to connect to Indigo's Websocket API. This will often manifest as Indigo Touch for Web hanging at the Loading page. Here are some troubleshooting tips that should get you back in business.
Enable Diagnostic Tools
Webserver Debug Options
In the Indigo client UI, go to Indigo > Advanced Web Server Settings... and enable Debug Logging. In rare circumstances you may need to enable Cache Debug Logging as well. This logging may provide some useful details.
Browser Debugging
Enable console debugging in your browser. The steps vary depending on the browser you're using, but in Safari go to Settings > Advanced > Show features for web developers. You should now see a Developer tab in settings and on the main Safari menu. Head to Develop and select Show JavaScript Console. Now trying to load Indigo Touch for Web and see if there are any errors shown in the console log (Indigo Touch for Web uses JavaScript to render the various pages).
Script Debugging
If you're having trouble getting a Python, JavaScript or other code to connect, it's best to add a lot of logging and error trapping to your code which will help to isolate any issues. You can always turn off or remove extra logging when you're done.
Make Sure You Have the Right Websockets Version Installed
Each new version of Indigo is tested against a specific version of the websockets library and having a different websockets version can potentially cause problems. If you can't connect to the server using Indigo Touch For Web, the websockets library may be causing some trouble. To check which version of the websockets library you have installed, open a terminal window and run the following command:
To see which version should be installed, head over to Python Packages and Indigo and follow the instructions there. Also, note that you may have multiple version of Python installed, so you'll want to make sure you're using the right pip by specifying the full version (pip3.11, pip3.13, etc).Make Sure You're Using the Right Security Layer
The security settings you chose when you started the Indigo Server affect how you connect to the web server.
| Security | Protocols |
|---|---|
| HTTPS enabled | must use links that start with https:// and wws:// |
| HTTPS not enabled | must use links that start with http:// and ws:// |
Test With a Simple Script or Link
Another diagnostic tool you can try is to attempt to connect to the server using simple, known methods to try to isolate the issue. There are sample websocket scripts near the top of the Integration APIs page. These scripts will attempt to make a simple connection to the websocket API.
Review Your Network Configuration
Some networking configurations can impact your ability to attach to the Indigo Server using the API endpoints. You should ensure that you're not blocking IPs or ports that you're trying to connect with. If you're running your traffic through a VPN, blocking or filtering traffic through applications like Little Snitch or PiHole, make sure these programs aren't blocking the traffic. Make sure that your Indigo Server and client are both on the same network (including subnet). Also check to ensure that nothing else is trying to use the port you're using with Indigo.
Other Potential Issues
There are other issues that may arise with the Indigo Web Server. If you are having issues outside the above, then you can use the next sections to help diagnose what might be causing them.
Check Your Hosts File
Sometimes, hosts file settings can cause conflicts. Review your hosts file (do not make changes unless you know what you're doing) to see if anything looks like it might be rerouting your connection. The hosts file is typically located in /etc/hosts. It should only contain lines similar to this:
127.0.0.1       localhost
255.255.255.255 broadcasthost
::1             localhost
If you have other declarations, especially for localhost, then that might be interfering with normal Web Server operation. We recommend commenting out any lines that are not the above lines to debug any issues you may have.
Check Your Server's Network Connection and Settings
Assuming your server machine is able to connect to your network, check to ensure that the server machine isn't connecting with both wired and wireless connections. This can sometimes cause issues with network traffic. It's generally best to stick to one connection method.
Try Local and Reflector Connections
If you can't connect locally, you still may be able to connect with the Indigo Reflector service. The reverse is also true. If you can connect via one method but not the other (both should work under normal circumstances) that may help you isolate the issue.
Disable Firewalls and Virus Protection
Sometimes various firewall products (including macOS built-in firewall) can block different types of network connections. Virus Protection software can be especially bad about interfering with network traffic. While troubleshooting it's recommended to disable all such software on your Mac.